

Hello, everyone! And welcome back, today on how to draw manga in 3D we’ll be drawing Raven from Vampire Kisses. Thanks go out to Kayg248 for the request. I hope you like today’s tutorial, and I’d love to hear your feedback. If you’d like to request a specific manga character to draw just click on the Request Tutorial button at the top of the page. We’ll be drawing Raven’s head today, and the tutorial is pretty straightforward so I’d recommend it for beginner to intermediate mangakas. At the end of today’s tutorial we’ll be doing a little shading and shadowing, so in addition to your pencil, pen and eraser you might want to have a grey pen/marker for the shadowing and a ruler to help you draw straight lines for the shading under Raven’s eyes. Let’s jump right in and learn how to draw Raven.
Step 1
Step 01: All of the blue lines you see in the tutorial are only construction lines and will be erased later on, so don’t press too hard on your pencil. Our final lines will be in black towards the end of this tutorial.
Let’s begin with our head circle. Unlike most other tutorials, we won’t be starting with a circle but with a vertical ellipse (taller than wide) for the head shape. After you have your head ellipse in place we’ll draw our center and eye lines. The center line will bisect our head ellipse, and extend both above and below the head ellipse. The eye line is horizontal and about a third of the way up the head ellipse.

Step 2
Step 02: Let’s add the outline of Raven’s jaw and a few facial features here. We’ll begin with the jaw line and begin on the left at about the spot where the eye line meets the head ellipse. We’ll draw a line that curves down to touch the center line, and then from the center line another line curving up to touch the head circle on the right at just about the spot where the eye line meets the head shape. If you feel that you’ve made Raven’s chin too pointy then take a second here to soften it up. Moving back up, we’ll draw two half circles on the eye line, one on each side of the center line, for the upper lids to Raven’s eyes. Next, we’ll draw the two small dashes for her nostrils just where the center line meets the bottom of the head ellipse. And finally, we’ll draw the mouth as a line with the ends curved up slightly, more so on the right than on the left. The mouth line is on the center line a little above the halfway point between the nose and chin.

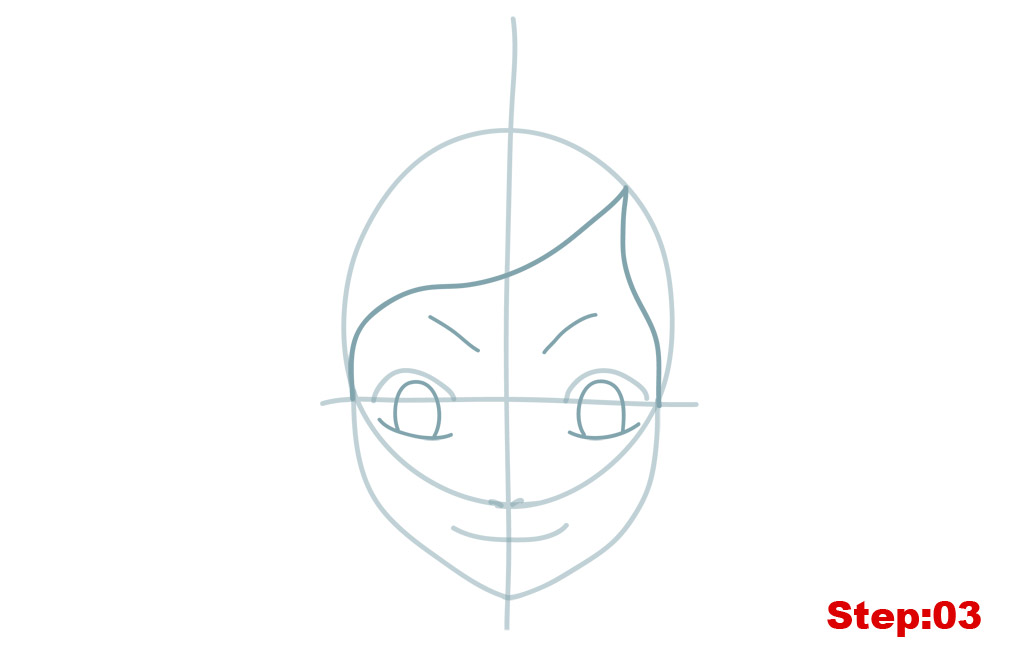
Step 3
Step 03: Good work so far. Let’s take this step from top to bottom starting with the hair lines. We need to choose a point on the upper right side of the head ellipse, and from there we’ll draw a curving line (that follows a roughly 45 degree angle) to the left that stops where the eye line meets the head circle. This should produce an outline of Raven’s bangs across her forehead from right to left. Starting at the same point on the upper right of her head we’ll draw a slightly curving line down to touch the point where the eye line meets the head shape on the right. Once you’ve got that, we’ll move to Raven’s eyes. We can begin by drawing the diagonal line on each side of the center line for her eyebrows, the eyebrow on the right is a little more curved than the one on the left. Next, we have to draw the lower eye lids on either side of her face. They are below the eye line and while they curve up slightly at the end they do not touch the eye line or close the eyes fully. Based on the lower lid line we have to draw the upside down “U” shapes inside her eyes to outline her pupils.
Step 4
Step 04: Let’s stick with the eyes in this step. Let’s start with Raven’s eyelashes. We’ll draw another half circle just above the upper lid line we’ve already drawn (in fact, it might overlap that line in some spots). Then, we’ll add the dashes for the lashes on the outer end of the arch. I’ve drawn five on the left, and four on the right. Between the eyelid and the eyebrow we should add a short diagonal line on each side for the creases. Inside the pupil of each eye, we’ll draw a small “c” shape in the upper right corner as a reflective spot. Before moving on, we need to draw the short dash on the center line just above the mouth and the small half circle also on the center line just below the mouth. This lower shape is an outline of the area that will be shadowed in our final steps.

Step 5
Step 05: Ok, mangakas, time to work on Raven’s hair for a few steps. Let’s start on the upper right side of the head where the hair outline from Step 03 comes to a point. We’ll draw a short line for a part in Raven’s hair above the head circle starting just above the point. Then, from the top of that line and moving to the left we’ll draw one large hair spike that stops on the head shape on the left. Next, starting on the bottom of the hair spike we just drew, we’ll add a longer, thinner hair spike that tapers to the left making it appear as though her hair were blowing in the wind. And, there’s one more hair spike on the left to draw that’s more vertical and stops on the cheek on the left. Going back up to the part in her hair, we have one hair spike to draw on the right that’s more vertical and stops on Raven’s cheek on the right.

Step 6
Step 06: We’ve got some more work to do on her hair in this step. We’ll be adding some more hair spikes to fill in some of the gaps and add some depth to her hair. We can start on her forehead where I’ve added two more hair spikes that curve to the left and overlap her eyebrow on the left slightly. Then, moving to the left side between the second and third hair spike, I’ve drawn two more, the upper one longer and more sinuous than the lower shorter one. And, near her cheek on the left, I’ve added a small spike to the end of the larger third hair spike. Jumping to the right, I’ve drawn two hair spikes coming off of the larger spike we drew in the previous step and fanning to the right. The upper spike is shorter than the lower one. Lastly, I’ve forked the bottom of the major hair piece on the right. Once you’ve got her hair the way you like it, we’ll move on.

Step 7
Step 07: Let’s begin this step by drawing the two skull barrettes in Raven’s hair. The bottom of the barrettes should touch the hair line across the forehead we drew in step 02. The skull shapes themselves are highly irregular and don’t need to be perfect skulls. Once you have those in place, you’ll notice the two irregular shapes I’ve drawn beneath both eyes. These areas are outlines of the spaces I’d like to shade in the final step. If you don’t plan on shading you don’t need to draw these, but if you do, I recommend having them as they’re a big help. Now, on the top of the hair and on the hair spikes on the left you’ll notice we’ve drawn a lot of irregular lines. These are to mark out the area where the light reflects on her hair, so we won’t fill in these spots in the final steps. If you don’t plan on doing any filling you don’t need to draw them, but if you do then you should draw some outline of the area you want to leave white. Lastly, before moving on, you can add the heart shape to the right of the head.

Step 8
Step 08: That’s it for our construction lines, everyone. Use your eraser to lighten all of the lines we’ve made so far and then take out your pen and trace your final lines. Here are a few things to keep in mind as you’re tracing: we only want to follow the outline of the hair and not trace the underlying head circle, under the mouth we only trace the bottom dip of the half circle shape and we leave the irregular shapes under the eyes completely untraced. Once you have your basic traced outline done, we’ll take a minute to work on line quality a bit and do some filling. The most important area in this step is the eyes. We should thicken the upper and lower lids and lashes, and also thicken the brows slightly. Then, we’ll fill in the pupils completely except for the tiny circle in the upper right hand corner of each pupil.

Step 9
Step 09: In this step, we’ll fill in Raven’s hair. All of her hair should be filled in, except for the areas at the top and on the hair spikes on the left that we outlined before, those areas we should leave completely empty.

Step 10
Step 10: Now, using your ruler, we’ll draw some straight diagonal lines inside the irregular shapes under Raven’s eyes. They should be very close together. Next, take out your grey pen/marker and we’ll shade the areas around her nostrils and the half circle shape just below her mouth.

Step 11
Step 11: After your ink dries, just take out your eraser and completely erase any remaining construction lines you can see. There you’ve got Raven from Vampire Kisses. If your goal is to become a great mangaka make sure to draw Raven again from memory. Then compare the final drawing with the original and correct any mistakes you might have made. Try once again from memory. This is the best way to build a huge library of shapes that you can use in the future for your own manga characters.
Draw with passion! -_^
Hiroshi


1 comment
Comments are closed.