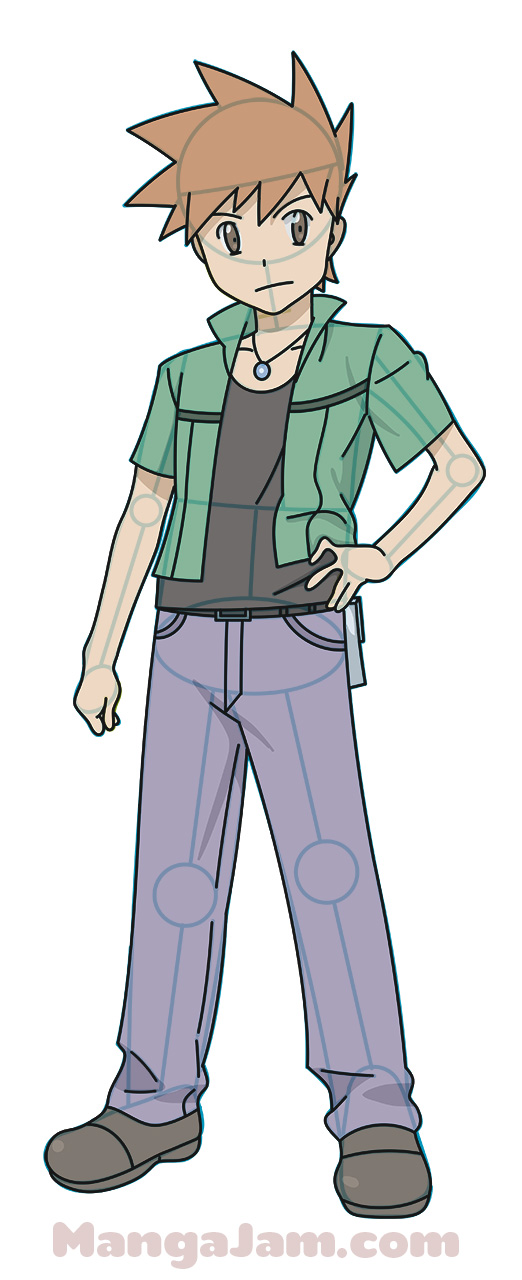
It’s great to see everyone again! We’re bringing you the Pokemon Trainer Red drawing tutorial requested by Mr. Hot Stuff. Red was only 10 years old when he became really interested in Pokemons. One day his biggest dream came true when professor Oak gave him and his rival Blue their first starter Pokemons along with a Pokedex and send them on a mission to fill it with all kinds of Pokemons. As you know it was the start of a great adventure! ^_^ We’re going to be drawing Red’s full body in today’s tutorial. This can be pretty tricky and it is recommended for intermediate to advanced mangakas, but we’ll take it step by step as usual so that even beginners can follow along and stock up their shape library. If you’re interested in learning how to draw other Pokemon characters just click on the Pokemon tag in the tag cloud on the right of the page. Get your materials out and we’ll learn how to draw Red.
Step 1
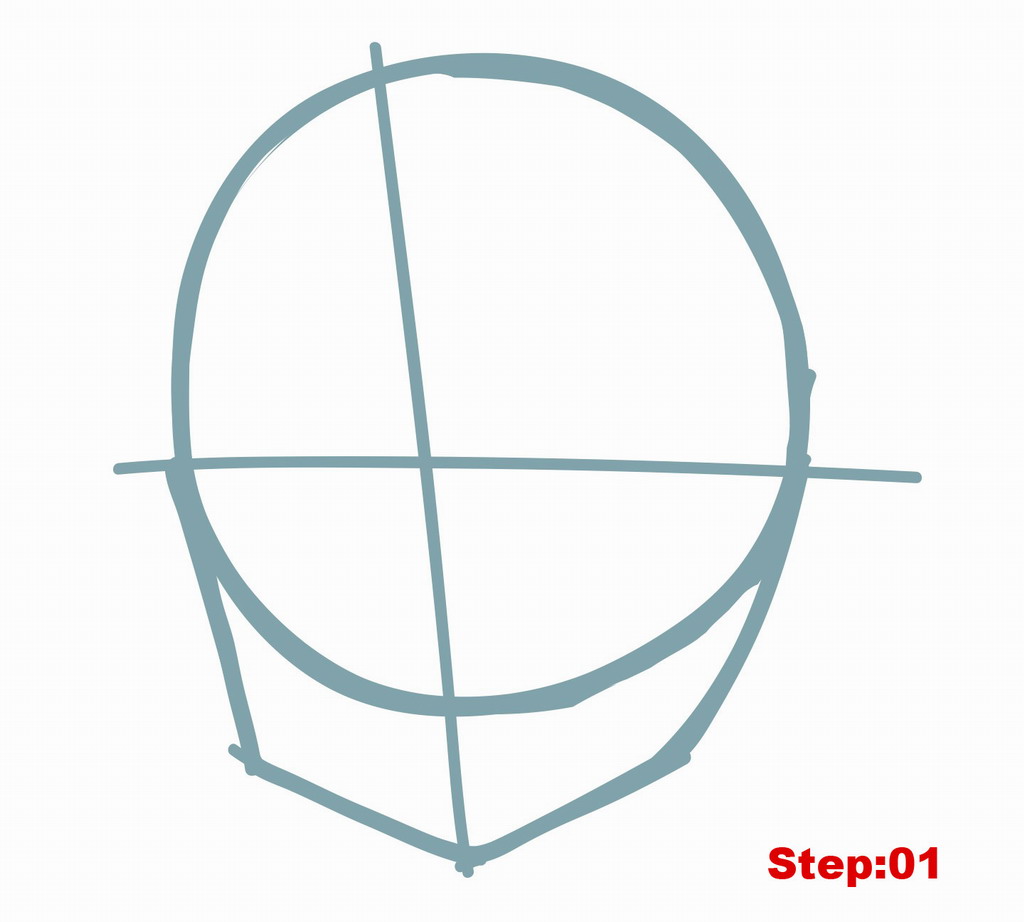
Step 01: All of the blue and green lines you see in this tutorial are only constructin lines and will be erased later on in the tutorial so don’t press too hard on your pencil. Our final lines you’ll see at the end of the tutorial in black.
This step focuses on the head which we will draw in the upper center of our paper. Each body seqment will be equal to the head and there will be a total of five segments in all so make sure to leave enough space on your paper for the rest of Red!
We’ll begin with our head circle. Once you’ve drawn that, we’ll add the center and eye lines. The center line is straight, but titled at a slight angle so that it starts at the top of the head circle a little left of center and extends down below the head circle. The eye line is horizontal and is a little below the half way point on the head circle. When we’ve got our head, our center and eye lines, let’s draw the jaw outline.
As you might remember from our previous tutorials, when the head is turned slightly as it is in Red’s case, the side that is turned towards us will be smoother and less angular than the other. In this case the right side will be smoother than the left. So starting on the left at about where the eye line meets the head circle we need to draw two lines, one almost straight down, the second at an angle to reach the bottom of the center line. From here, the chin, we’ll draw two lines back up to the head circle on the right side. Again, the angle of the jaw will be smoother than on the left.
Step 2
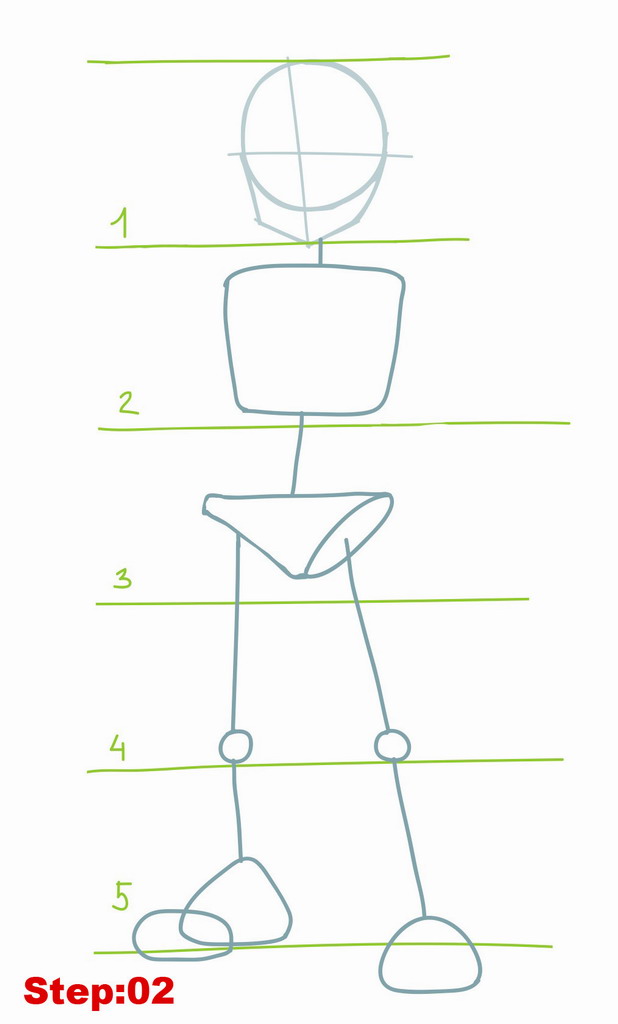
Step 02: So based on the size of the head, we’ll need four more head-sized sections for each of the body segments. I’ve drawn them as green construction lines so you can see the sections easier.
Now, in this step we’re going to be adding the main body shape outlines to each of the sections. Section 2 is for the chest/torso, section 3 is for the hips, 4 is for the legs and knees, and five for the lower legs and feet. Due to the way Red is posed, turning slightly to the left and with his foot on the right a little bit forward, we’ll be able to see more of the body on the right side of the picture. Let’s get drawing!
In section 2 below the head we should draw a square like shape leaving just a little space above and below the shape. The edges of our “square” will be rounded and the top of the square should be slightly wider than the bottom. Connect the chest to the head with a short line just to the right of the chin.
Moving down to section 3, we’ll draw the hips, which are placed in about the middle of section 3. We need to draw an underwear like shape for the hips (think panties in 3D ^_-). We’ll start by drawing the titled ellipse on the right and then adding a triangle shape for the rest of the pelvis. When you’ve got that, connect the pelvis to the chest with a line.
In section 4, we’ll draw the two small circles for the knees at the bottom of section 4. We’ll then connect the knees to the pelvis with straight lines. The line on the right will stop in about the middle of the ellipse we drew for the right hip.
In section 5, we’ll begin by drawing the shapes for Red’s feet. A little note here about the feet. The foot on the left isn’t actually bigger than the one on right, nor is the leg on the right any longer than the leg on the left. The key here is that in order to give Red the 3D look we’re going for, we have Red’s foot on the left turned outward so we see the whole foot while on the right we’re looking at the foot straight on so we see the front and top of the foot but not really much of the side. Also, Red’s right foot should look like it’s slightly ahead of the left foot, and to achieve this we make the right leg a little longer. so, at the bottom of section 5 below the knee circle on the left, we’ll draw a rounded triangle shape for the left foot, which we can connect to the knee with a straight line. The foot shape on the right will be even more rounded than the shape on the left. It is also placed a little to the right of the knee and not directly below it. When drawing the foot on the right it should overlap our section 5 line with about half the foot below the line. We’ll then connect the foot to the knee with a straight angled line. Before moving on we need to draw the horizontal ellipse (longer than tall) that overlaps the outer end of the left foot shape, which is for the toes of the foot that we can see.
Whew!! That was quite a step. But now that we’ve got all the major shapes in place we can move in to focus on individual sections and details.
Step 3
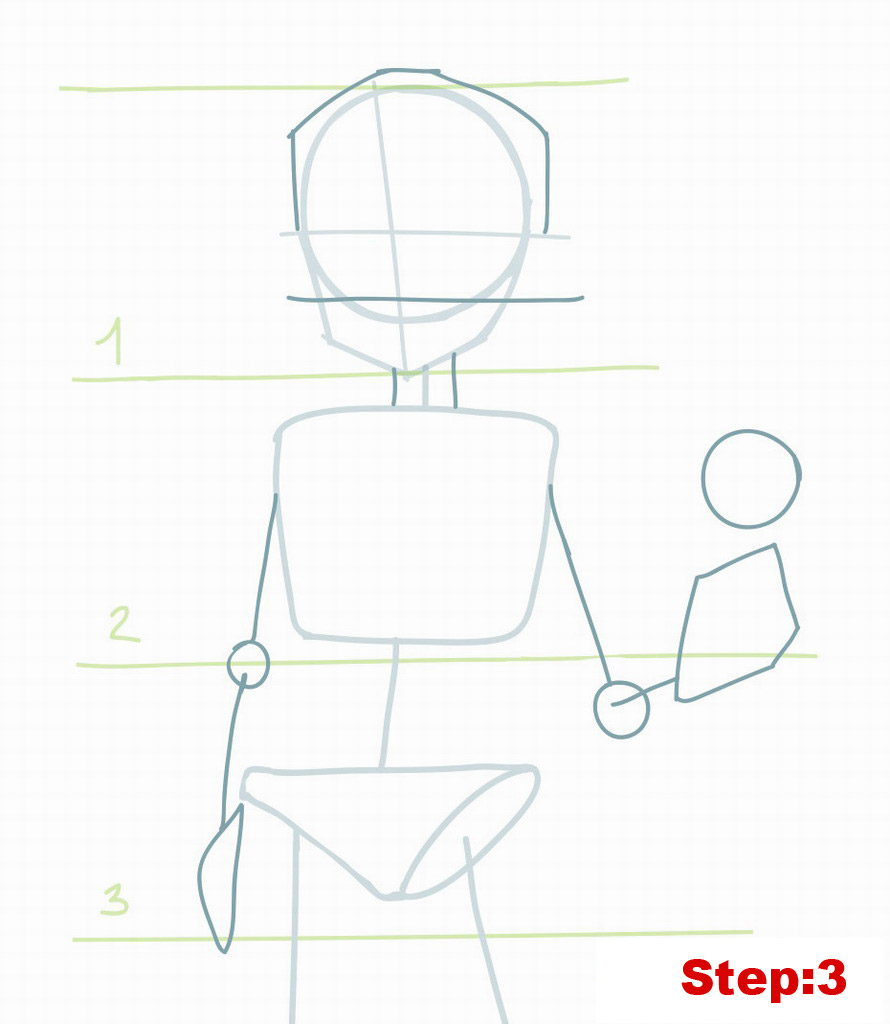
Step 03: Ok, mangakas, in this step we’ll do an outline of Red’s hat and work on the arms. Let’s start up in section 1 with the head. We’ll being by drawing another horizontal eye line below our first one. It should be quite low, near the bottom of the head circle and pass through the jaw as well. When you’ve got that we’ll work on the outline for Red’s hat. It might be a good idea to start at the top of the head and draw the short horizontal line that’s above the head and just to the right of the center line for the top of the hat. Then we can draw the two lines on either side connecting the sides to the top of the hat. As you can see from the image above the hat sits very close to the head on the left, but is farther away on the right. Next, let’s draw the two short lines for the neck connecting the chest to the jaw. The left line for the neck should be just to the left of the chin point.
Now, we’ll move down to do the outline of the arms and hands. We’ll begin with the arm on the left. Start by drawing the small circle for his elbow that rests on the line between section 2 and 3. Then down in section 3, just below the hip on the left, we’ll draw the irregular half moon, or UFO shape for the hand (actually, it’s the pocket of his pants, inside of which is his hand -_^). Then we can connect the hand to the elbow circle, and the elbow to the chest shape with straight lines. The arm should touch the chest about a third of the way down the chest shape. For the arm on the right, we’ll start by drawing the elbow circle a little below the section 2 line and further out away from the body than the elbow on the left. Then, we’ll draw the irregular hand shape on the section 2 line. The hand is a very irregularly shaped 5-sided polygon, so I recommend just using the image above as a guide to copy. Above the hand we’ll draw a medium sized circle for his Pokeball which he is casually tossing in the air. To finish up this step, just connect the hand to the elbow and the elbow to the chest at about the same spot on the body shape as on the left. Notice, the forearm line overlaps the elbow circle and stops in about the middle of the elbow as the forearm is pointing toward us, while the upper arm line starts on the outside of the elbow circle.
Step 4
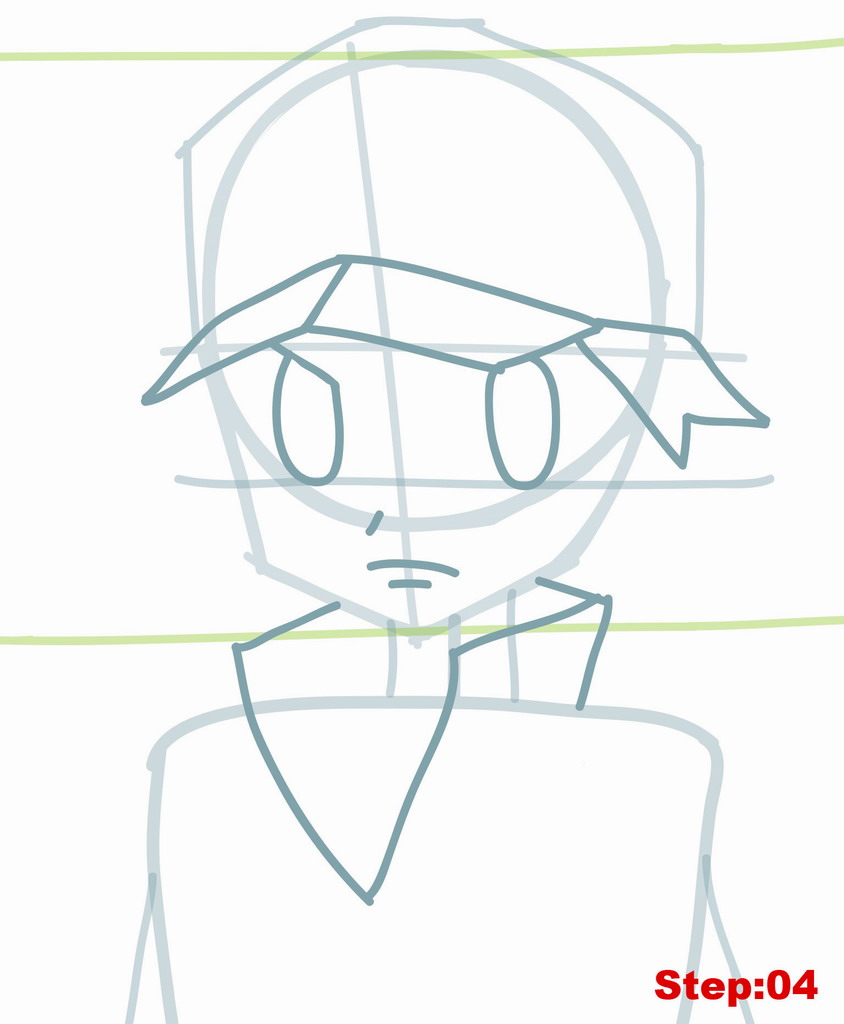
Step 04: Great work so far everyone! Let’s stick with the head and neck for a couple of steps. We’ll begin by drawing the bill of his hat. It might be easiest to draw the upper and lower “^” shapes, the bottom “^” starting outside the head circle and stopping at about where we want the eye to be, and the top “^” starting on the head circle and stopping above the top eye line and to the right of the right eye. Then connect the ends with angled lines, and finally draw the line in the middle dividing the bill into two halves. Got it? Great.
We can continue from the point of the bill of the hat on the right and draw the forked hair piece. Then, we’ll move on to the eyes. We’ll start with the eye on the left, beginning with the angular line for the upper lid that starts just on the bottom of the hat. Then add the “U” shape for the eye, the bottom of which should rest on the lower eye line. The eye on the right also sits on the lower eye line and is more of a full ellipse with just the top corner of the eye hidden behind the right corner of the bill of his hat. Let’s move down and add the dash on the head circle to the left of the center line for his nose. And below that, in the jaw area we’ll add the mouth which curves down slightly at the ends and a shorter straight line below that. Finally, we’ll draw the collar to Red’s jacket. It’s probably easiest to draw the large “V” shape first, the tops of which are just below our upper section 2 line. The left leg of the “V” is outside of the body, while the right stops in about the middle of the neck. Then, on the left, just connect the top of the “V” to the jaw line. On the right we’ll draw a similar line on the top of the “V” but we’ll then need to draw a second line connecting it to the jaw line on the right and a third line connecting that corner to the body.
Step 5
Step 05: Let’s stick with the head in this step and we’ll add some details here and some hair ^_^. Start with the ears. On the left we’ll draw a very thin “c” shape on the jaw line using the lower eye line as our mid point. On the right, we’ll draw a larger “C” shape starting from the tip of the hair fork we drew in the previous step and stopping on the jaw on the right. Inside the ear, we’ll add a second smaller “c” shape for the inner ear. Next, we’ll add the squiggly “z” shape for the hair spike on the left that between the bridge of the hat and the middle of the ear. When you’ve got that, go ahead and draw the two concentric “c” shapes for the mark on his hat just above where the bill of Red’s hat comes to a point. Next, we’ll work on the eyes. In the eye on the left we’ll draw a “C” shape inside the inner right of the eye (closest to the center line). Then we’ll draw a small almost full circle for the reflection spot in his eye and a second smaller “c” shape connecting the spot to the eye. For the eye on the right we should do about the same thing, drawing a “C” shape inside the inner eye closest to the center line, then add a circle for a reflection spot and a second “c” shape. When you’ve got the eyes done, we’ll draw the sharp line over the eye on the right for his eye brow. Then, on the right, we have to add three more hair spikes. We’ll draw a “V” on the underside of the forked hair spike and one on the top of the forked hair spike. Then from about the middle of the ear on the right we’ll draw a forked hair spike that then connects to the jaw. When you’ve got all that, let’s move down to the neck area and we’ll draw his shirt. Start with the upside down checkmark shape that starts at the neck line on the left and stops at the bottom of the “V” shape. Then add the slightly curving line for the top of his t-shirt.

Step 6
Step 06: Now for steps 6-9 we’re going to be working on Red’s arms, pants and feet. There are lots of irregular shapes and lines in these steps that aren’t really possible to describe in detail. So, I’ll point out how I think it’s best to draw them but you should use the images above each step as a more concrete guide for your own drawing. Let’s get started. Here, we’re going to draw Red’s right arm, fingers and the marks on the Pokemon Ball. Here’s the order I would follow. Start by drawing the long “V” or icicle shape for the shoulder strap of his backpack, starting at the bottom right corner of the collar. Then draw the thin ellipse shape for the opening of the sleeve of his t-shirt. Next, do the shoulder, connecting to the right side of the ellipse we just drew, the left side of the ellipse will touch the “V” shape. Moving on, you might want to draw the fingers first on the hands, add the thumb. And then, from the end of the pinky finger draw the smaller and then larger “C” shapes around the wrist for Red’s wrist band. Only then will we draw the arm proper. Start with curving “s” shape for the top side of the forearm connecting it to the top of the wrist band. And then draw the bicep line connecting the “s” to the ellipse of the sleeve. Finally, draw the lower part of the arm. To finish off this step, draw the curving line in the Pokemon Ball and add the circle.

Step 7
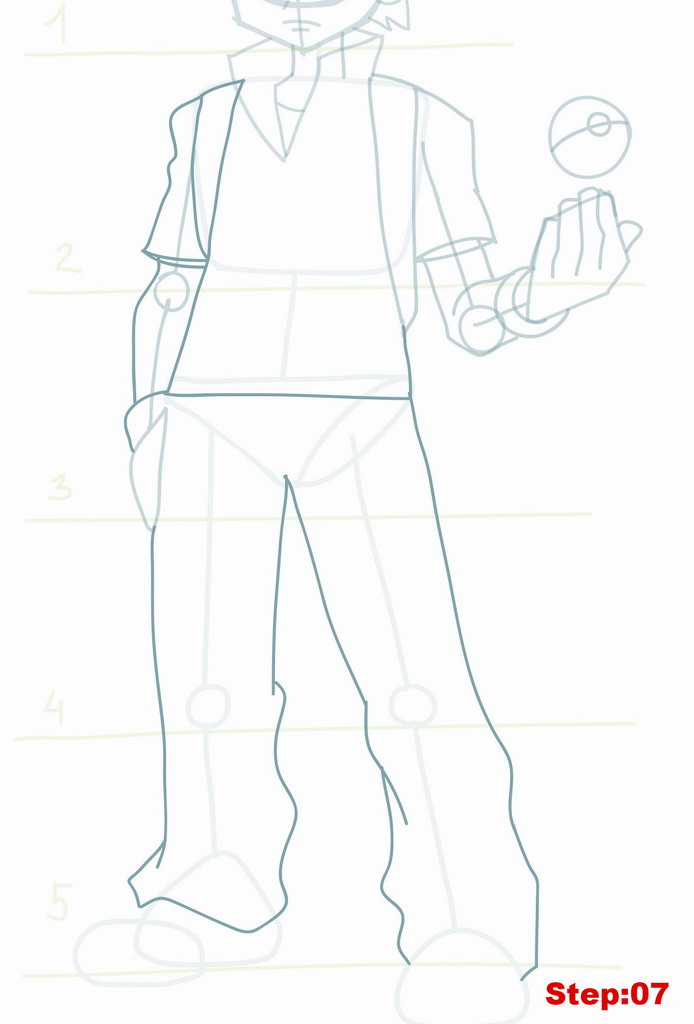
Step 07: Now for Red’s arm on the left and the pants. Again, we’ll start with the “v” like shape for the should strap to his backpack, though notice that it’s a lot shorter than on the right. No need for an ellipse for the sleeve, so we can just draw the shoulder and two lines just above the elbow circle to finish the sleeve. Next, we’ll finish off the rest of Red’s jacket connecting the bottom of the “V” shapes on either side with a line that runs across the top of the pelvis for his pants line. If you’ve done it right then the jacket line on the left will also serve as an arm line. Just connect the corner of the jacket with the pocket with a “C” shape for the wrist band, and then connect the sleeve with the wrist band using a slightly curving line. When you’ve done all that, we’ll draw the pants. Just two things to note here. Firstly, the top of the pants and the inner seam are fairly straight, even coming to a point in the crotch area, while the bottom of the pants are squiggly suggesting bagginess and wrinkling/overlap. The second thing to note when drawing the pants is that the bottom of the pant leg on the left is closed as it is hidden behind the shoe, overlapping 3d principle here, while on the right we leave it open.
Step 8
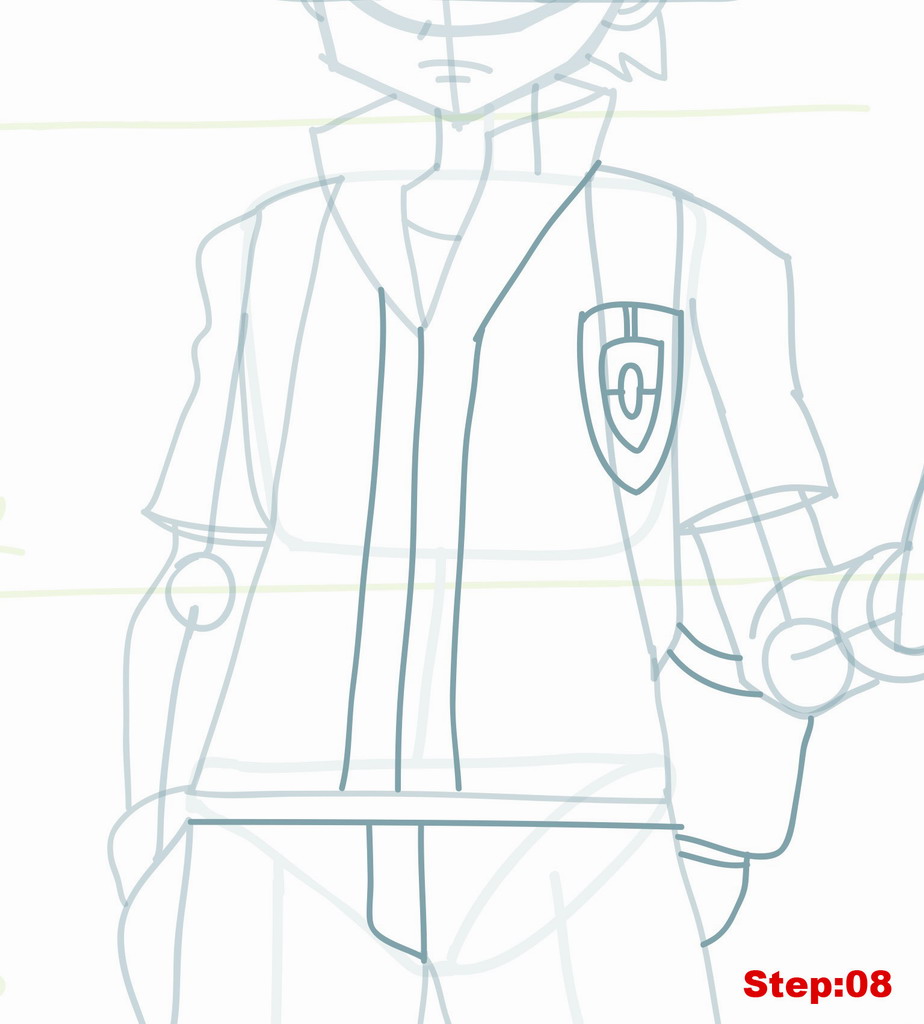
Step 08: We’ll continue here to do some detailing to the clothes and add Red’s back pack. Let’s begin with the three lines on his jacket. You can start with the center line from the bottom of the “V” neck, add one to the left and add one to the right. On the right we need to connect our line with the bottom of the collar on the right. Then we can draw the shield on the right side overlapping the shoulder strap for his backpack. Draw a larger shield shape and then a smaller one inside of it. Inside the small shield add the vertical ellipse (taller than wide), then the dash on either side of the ellipse connecting it to the inner, smaller shield, and finally, the upper two dashes connecting the inner shield to the outer one. Moving down to the pants, we’ll draw the straight line across the pelvis just below the bottom of the shirt, and then the shape for his zipper. When you’ve got that you can use the image above to guide you in drawing the backpack using the elbow on the right as a guide.
Step 9
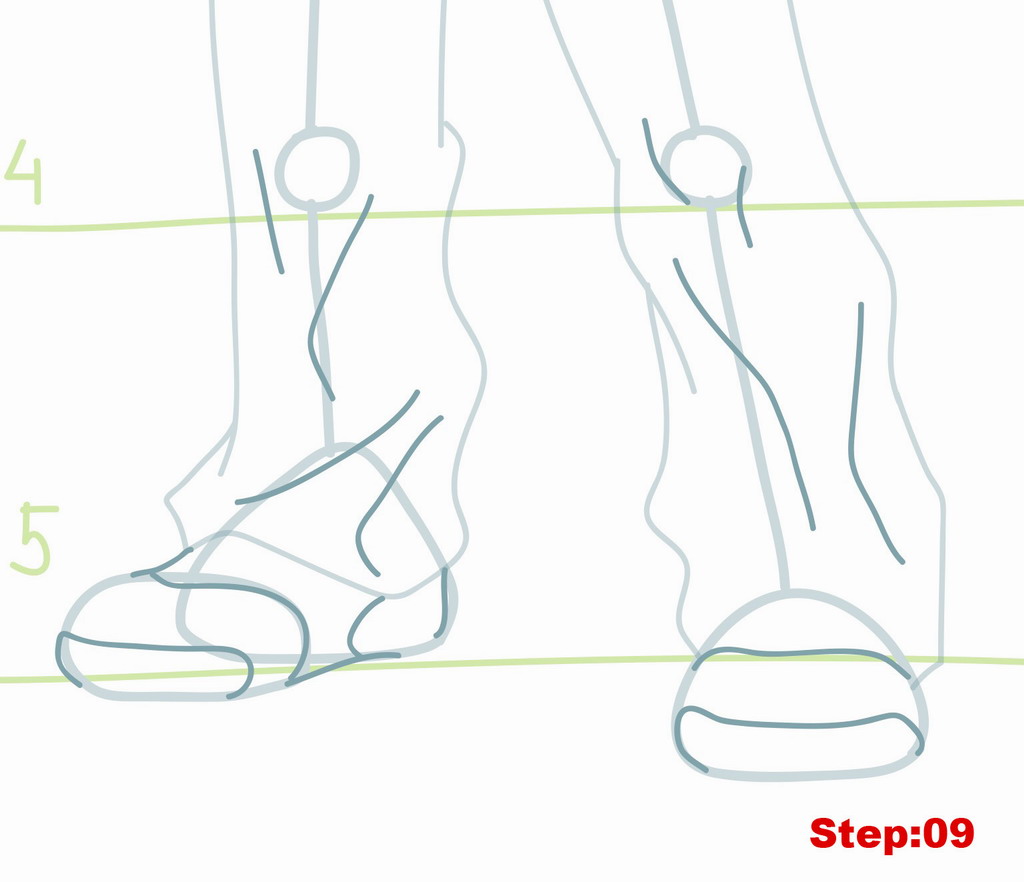
Step 09: Here, we’ll draw the wrinkle marks in Red’s pants and then the marks on his shoes. The lines in the pants are irregular squiggle marks, 2 of them are around the knees and then 2 more longer ones lower, towards the shoe. Do your best to imitate the irregular shapes on the shoe.
Step 10
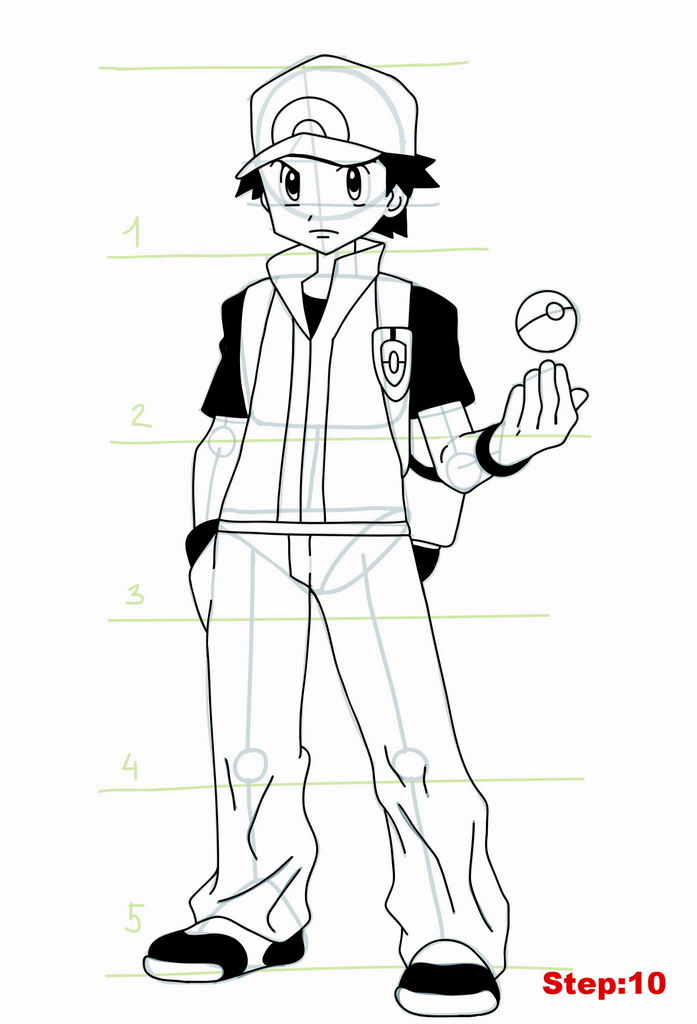
Step 10: That’s it for our construction lines, mangakas. Take out your eraser and lighten all of the lines we’ve made so far and then get out your pen and trace your final lines. Then, using your pen, we’ll fill in the following areas: Red’s hair, the pupils of his eyes leaving the circular reflection spot empty, the sleeves of his T-shirt, and the shirt area inside the “v” neck shape, the wrist bands, the band on his backpack, the bottom of his backpack, and the shapes on his shoes.
Step 11
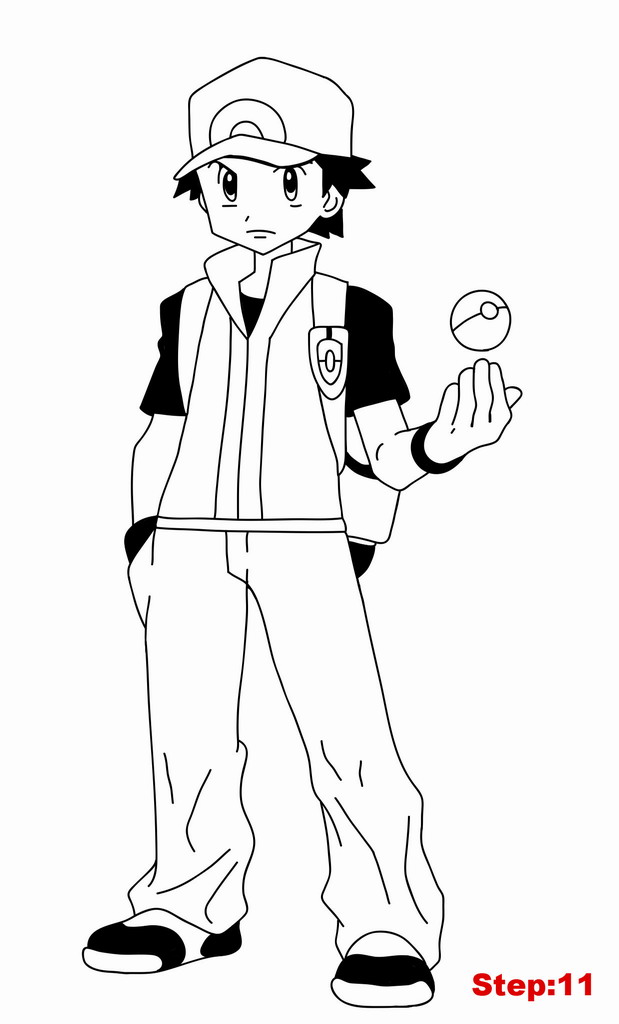
Step 11: Once your ink dries, just take out your eraser and completely erase any remaining construction lines that you can see. Take a look, you’ve done an amazing job of drawing Red Pokemon Trainer! If your goal is to become a great mangaka make sure to draw Red again from memory. Then compare the final drawing with the original and correct any mistakes you might have made. Try once again from memory. This is the best way to build a huge library of shapes that you can use in the future for your own manga characters.
Draw with passion! -_^
Hiroshi



5 comments
Your guides have really helped me a lot
Comments are closed.