Click here for more One Piece tutorials
Welcome back mangakas! Today on How to Draw Manga in 3D our drawing tutorial is on Usopp the Straw Pirate from One Piece. Usopp is known as the marksman of the Straw Pirates who’s able to hit just about anything he trains his eye on with his slingshot or cannon. He’s also a pretty good engineer, rigging up new devices on board and tinkering with anything. But he’s not just a wiz with machines, he’s also an accomplished artist in his own right ^_^. Usopp is a great character to draw as there are several examples of our 3D principles in action, which we’ll see below, and he’s not too difficult. If you’re interested in learning how to draw other One Piece characters just click on the One Piece tag in the cloud tag on the right of the page for all of our One Piece manga drawing tutorials. Get your pencils ready and we’ll learn how to draw Usopp.
Step 1
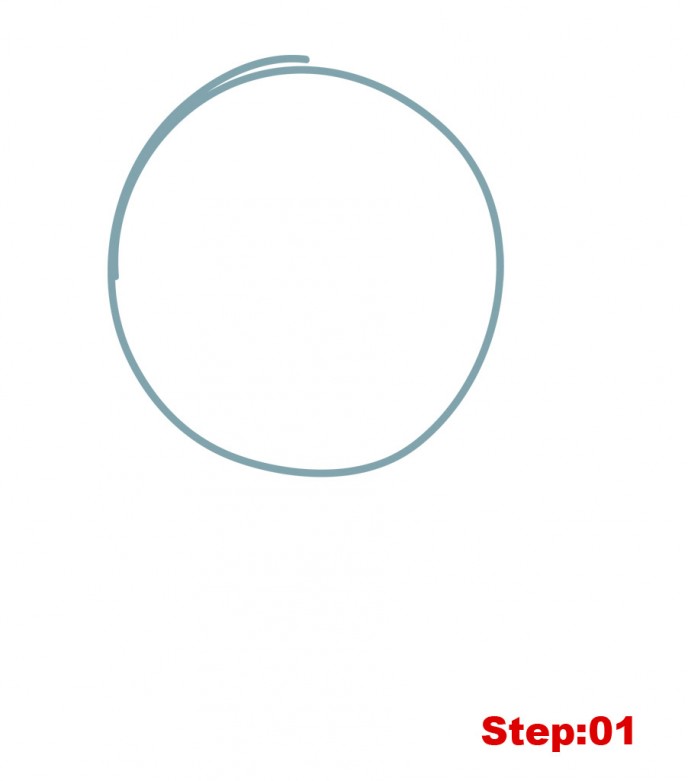
Step 01: As all of our returning mangakas will already know all of the blue lines you see in this tutorial are only construction lines and we’ll be erasing them later on. So, it’s important not to press too hard on your pencil when drawing these lines. You’ll see our final lines in black towards the end of the tutorial.
We’ll start with a fairly large circle in the upper left of our paper. We should leave space around the edges and under the circle for Usopp’s jaw and hair. As you can see in the image above it doesn’t have to be a perfect circle, in fact mine isn’t perfect. As it can be quite difficult to draw a perfect circle I recommend going around with your pencil a few times very lightly to get an outline of a circle and then draw your actual circle on top of that. It always helps to have a guide ^_^.
Step 2
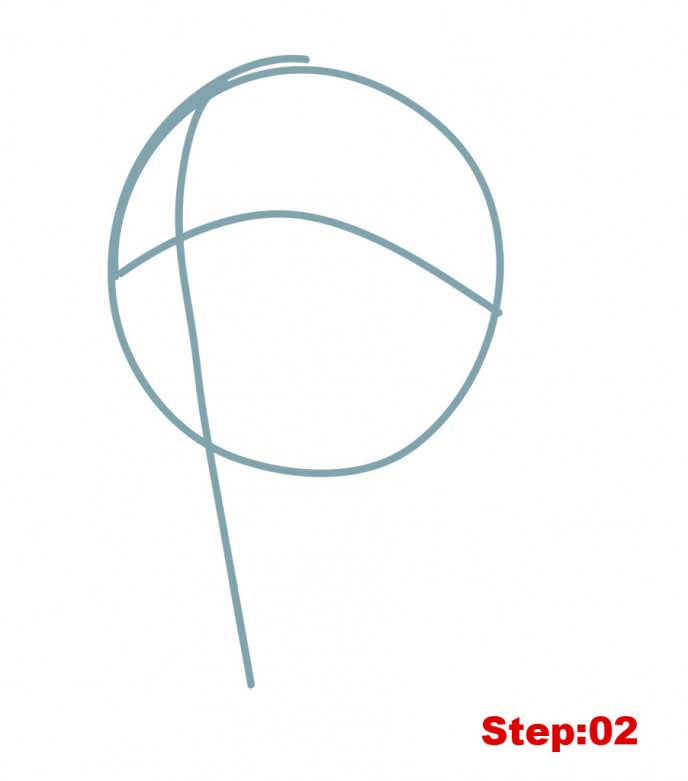
Step 02: Let’s move on to add our center and eye lines. As you can see in the introductory image, Usopp’s head is turned away from us. This means that we’ll be able to see much more of the side of his face on the right than on the left. It also means we have to shift our center line to the left. Draw your center line about a quarter of the way from the left of the head circle, curving slightly at the top and extending down past the bottom of the head circle nearly to the bottom of our paper. Next, we’ll draw our eye line. Starting on the left of the head circle at about the half way point our line will curve up in the middle of the head circle (past the center line) before curving back down to touch the head circle on the right.
Step 3
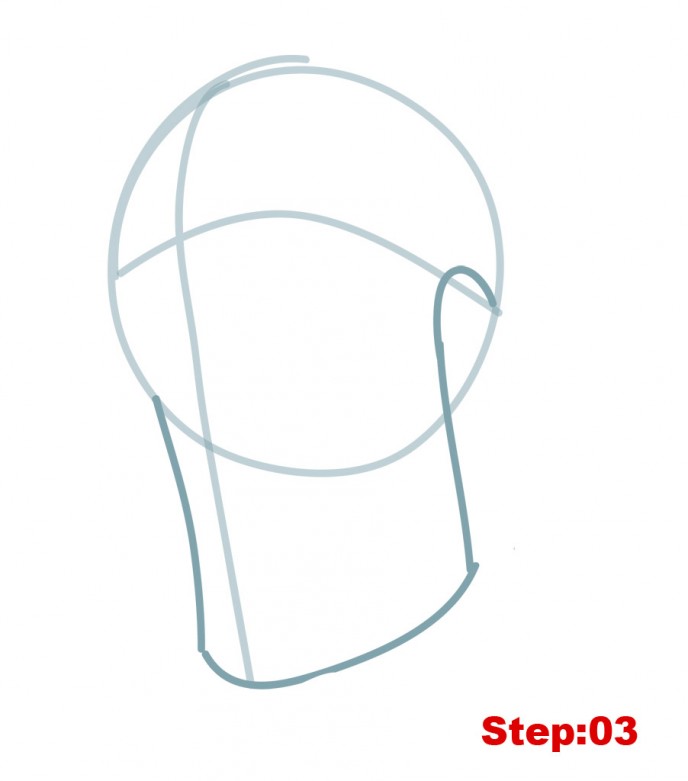
Step 03: Great job so far. Now, we’re going to add the construction lines for Usopp’s jaw. It’s actually three lines that we have to draw. Starting on the right where the eye line meets the head circle we’ll draw a hook that extends down but isn’t as long as the center line. Then, on the left, we’ll draw a line down from the head circle that’s just a little shorter than our center line. And lastly, we’ll draw a slightly curving line connecting the line on the left, the center line and the line on the right.
Step 4
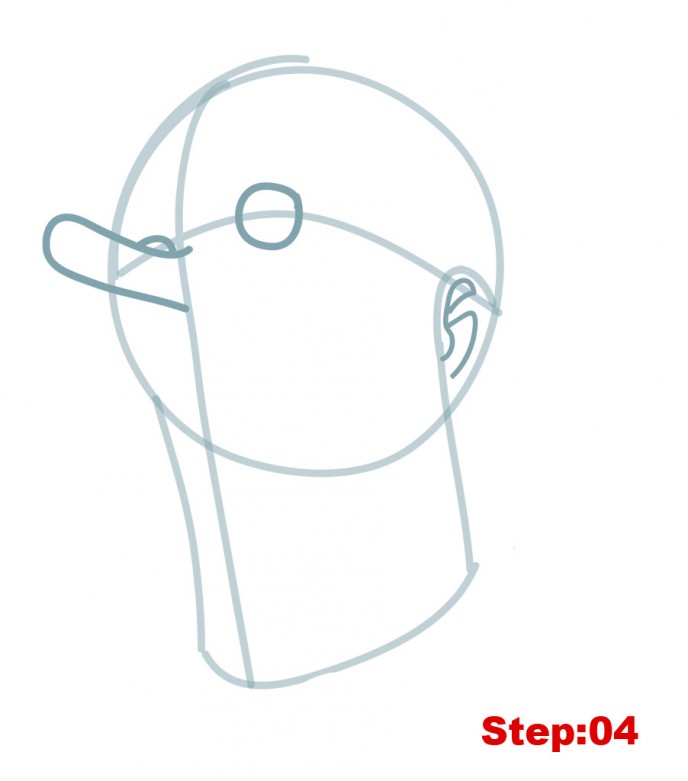
Step 04: Time to work on some facial details. The top of the hook shape we drew in the last step is really Usopp’s ear. You can begin this step by adding the squiggles and irregular lines to the inside of the top of the hook for his inner ear. Next, we’ll draw a small circle on the eye line just to the left of the middle of the head circle for his eye on the right. Then, on the center line, we’ll add the elongated “U” shape for Usopp’s signature nose which he inherited from his mother. And just in the corner above the nose, we’ll draw a small half circle for his eye on the left. As you can tell already, most of his eye on the left and the whole left side of his face will be hidden from view behind his nose. A great example of our overlapping 3D principle.
Step 5
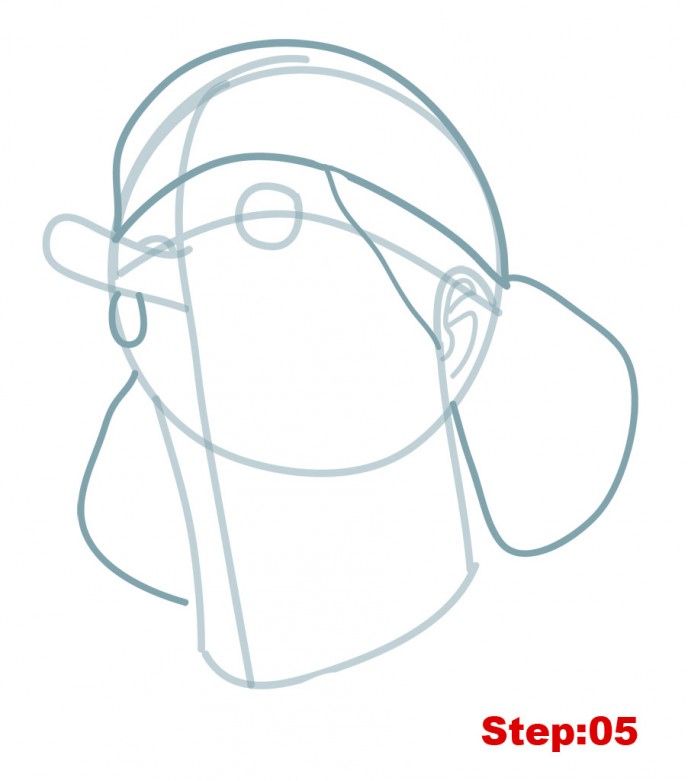
Step 05: In this step we’ll be drawing outlines for Usopp’s hair and bandana. The shapes can be a little irregular so if you don’t get them the first time, no worries, just erase a little and try again. Let’s start, though, by drawing the bandana. We need to draw another line across the head that parallels the eye line above it. We should start at the point on the left where the top of the nose touches the head circle and it should stop just above the ear on the right. Then we’ll draw a larger curving line around the head for the top of the bandana, the line should trace the head circle on the right. After you’ve got that, we can add the diagonal line from the bottom of the bandana to the ear.
Now, we’ll draw the irregular shape from the bottom of the head band to the bottom of the ear/head circle outside the head. It should look a bit like a dinosaur plate. On the left we just have to draw a soft “u” line from the head circle to the jaw for the hair on the left (it’s smaller in part because it’s hidden – overlapping 3D principle – and in part because it’s farther away from us – size 3D principle). Before moving on, there’s a small half circle to draw on the left just below the nose and along the head circle.
Step 6
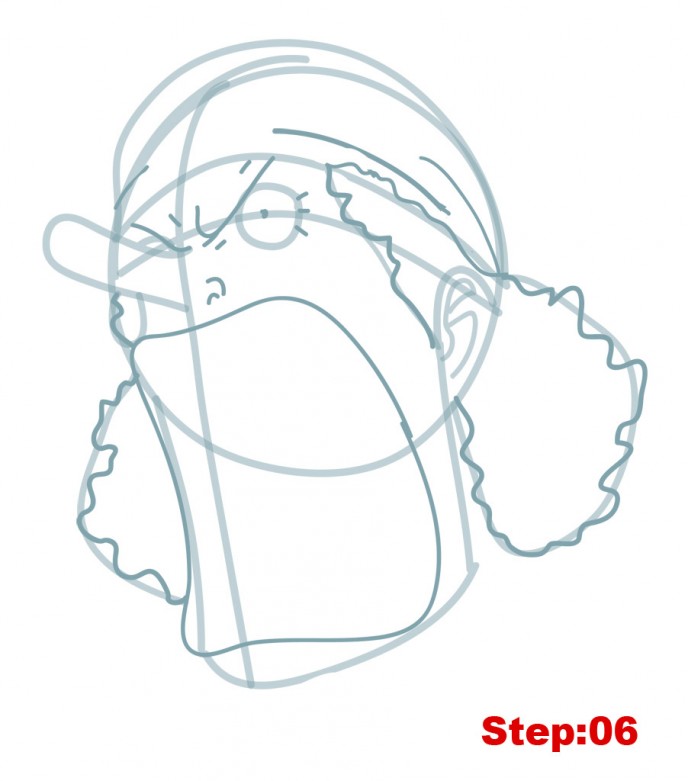
Step 06: Well mangakas, we’ve got a lot of detail in this step. Let’s start with Usopp’s hair on the right. We’ve got to trace out a zig zag pattern for his hair following the rough outline of the hair shapes we drew in the previous step and starting where the diagonal line on his face touches his ear. Next, we have to draw the Usopp’s gigantic open mouth. The shape is irregular and it’s important to note that it actually goes outside the jaw line we drew on the left. Try it and erase if you need to, practice makes perfect ^_^.
Once you’ve got the mouth we can draw the other zig zag pattern for the hair on the left touching the mouth line we just drew and not the jaw line. There’s also a little zigzag in the circle we drew just under the nose on the left. Now, up to the eyes. Add a dot in the center of the eye for his pupil and the three small dash lines on the right of the eye for crow’s feet. Then we’ll draw the sharp hook shape for his eyebrow on the right and a shorter diagonal line on the left. (It’s shorter because it’s ‘farther’ away from us: size 3D principle.) Next draw the two small ‘c’ shapes near the center line for his nostril. And, lastly, as you can see there are a few lines in the bandana and around the eyebrows that we should add to make wrinkles.
Step 7
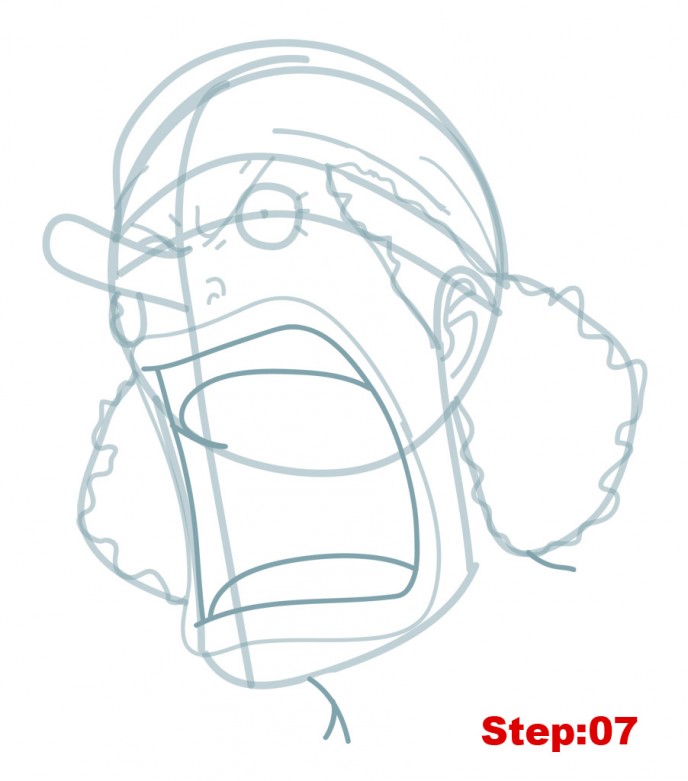
Step 07: Continuing, we’ll draw a ‘D’ like shape just inside the mouth line we drew in the previous step. This will clearly outline Usopp’s lips for us. Notice how the horizontal lines overlap the vertical line on the left. We definitely need this as the overlap will define the inside of his mouth (overlapping 3D principle). Now, inside the mouth we have to draw two “c” shapes for his teeth. The upper one actually begins on the head circle line, and the lower one just to the right of the left corner of the mouth. After that, just add the small curving line starting at the back of the hair and the forked line just under his chin for his neck and we’ve got this step all wrapped up.
Step 8
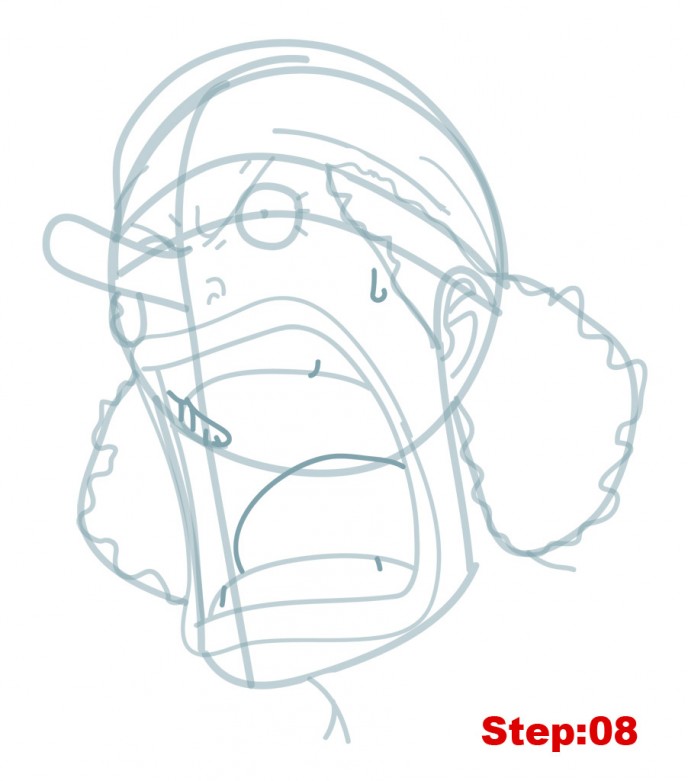
Step 08: Just a few more markings and we’re all done. In this step we’ll draw the little hook for the bead of sweat on his face, the large half circle in his mouth for his tongue, the teeth shape on the top left of his mouth with lines separating out individual teeth, and lastly the three little vertical dashes to the teeth shape.
Step 9
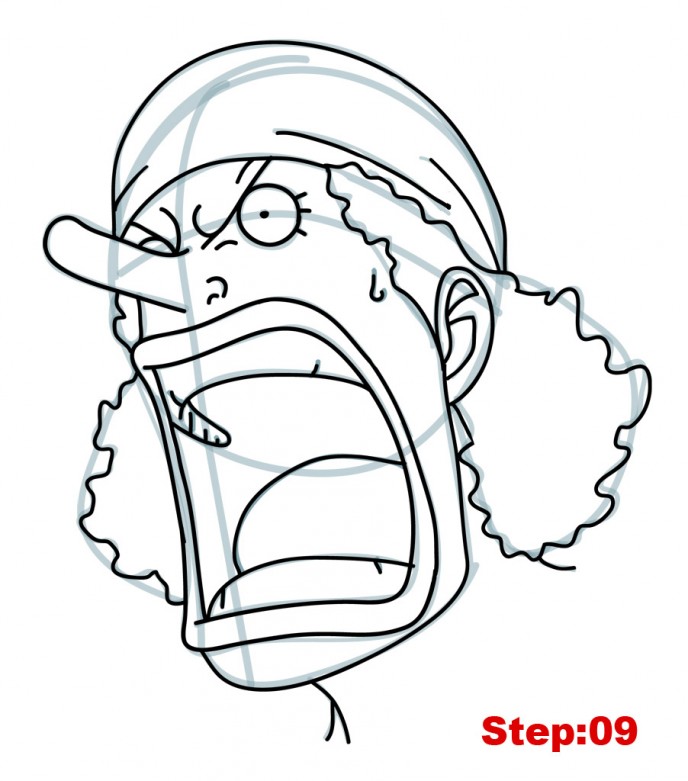
Step 09: That does it for our construction lines. Use your eraser to lighten all of the lines we’ve made so far and then take out your pen and begin tracing your final lines. As you go around pay attention to the overlapping areas of the nose, the lines on the left side of the mouth, the top of the mouth that hides the hair on the left and how the lips hide the left side of the jaw. Once you’ve got your final lines in place we’ll move on to our last step where we’ll do some work on line quality and shading.
Step 10
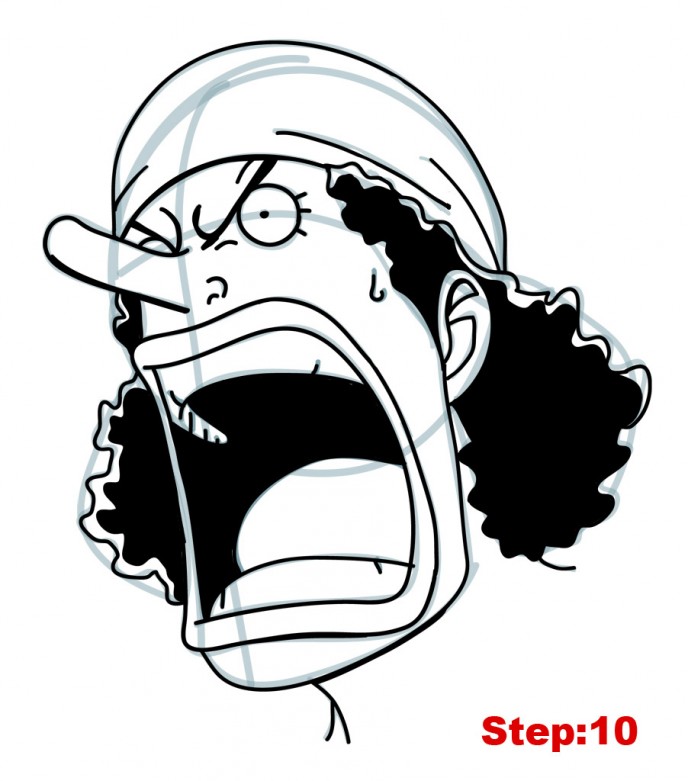
Step 10: Although we’ve got a great looking Usopp already, if we do some work on thickening some of the lines he’ll really stand out on our page. As you can see in my image above, using the same pen I’ve thickened the lines slightly for the bottom of the nose, just under the bottom lip, bottom of the jaw, and his eyebrows, the top of his inner ear and the bottom line of Usopp’s bandana. Try it yourself and you’ll see how much depth it can add to our image. Before finishing up, let’s fill in the inside of Usopp’s mouth and shade in his hair leaving a small gap between the shaded area and the final line.
Step 11
Click here for more One Piece tutorials
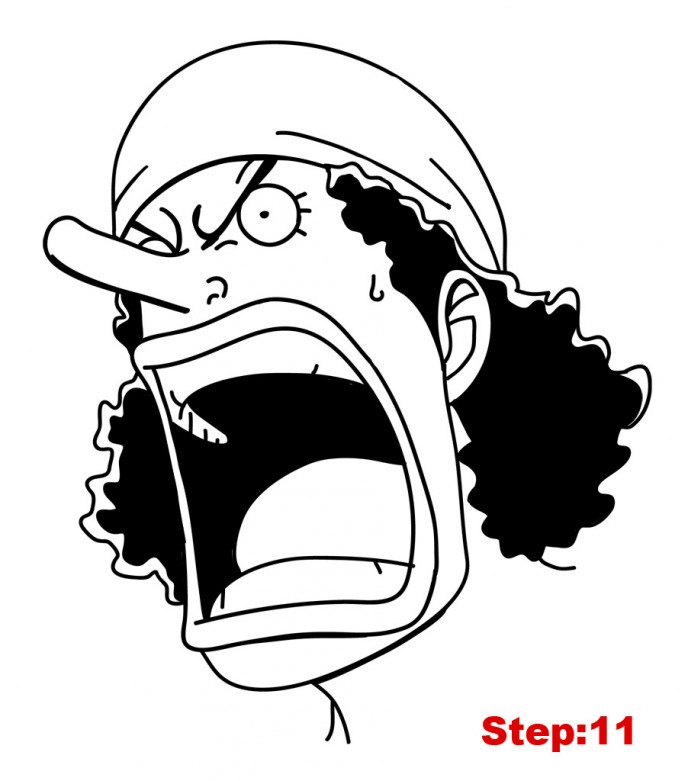
Step 11: That’s it mangakas! Once the ink dries on your drawing, use your eraser to completely erase any remaining pencil construction lines you can see. Now you’ve got Usopp from One Piece! If your goal is to become a great mangaka make sure to draw Usopp again from memory. Then compare the final drawing with the original and correct any mistakes you might have made. Try once again from memory. This is the best way to build a huge library of shapes and get the tracing experience necessary that you can use in the future for your own manga characters.
Draw with passion! -_^
Hiroshi







3 comments
Comments are closed.