Click here for more One Piece tutorials
Hey, Mangakas! We’re bringing you a triple request today, Trafalgar Law from One Piece, for Tigo, Aphophis and Mynigg anatsu. I hope you guys like the tutorial, let me know what you think in the comments. Trafalgar is one of the Shichibukai and the leader and doctor of the Heart Pirates, a rival to Luffy D’s Straw Hat Pirates in the One Piece Manga. Trafalgar is known for his hat which hides most of his hair. We’ve got more One Piece tutorials coming your way. If you’ve got any requests please be sure to post yours on the requests page by clicking the request tutorial button at the top of the page. We’ve also added a new search function to the site so be sure to search for your character before posting your request to see if it’s already up on the page. Let’s get our materials ready and learn how to draw Trafalgar today.
Step 1
Step 01: All of the blue or green lines you see in this tutorial are only construction lines and we’ll be erasing them later on. So, it’s important not to press too hard on your pencil when drawing these lines. You’ll see our final lines in black towards the end of the tutorial.
We’ll start with a fairly large circle in the middle of our paper. As it can be quite difficult to draw a perfect circle I recommend going around with your pencil a few times very lightly to get an outline of a circle and then draw your actual circle on top of that. It always helps to have a guide ^_^.

Step 2
Step 02: Now, because of the way Trafalgar has his head turned in our pose the center and eye lines are going to be very different from our usual lines. For this step and the next you’ll definitely want to use the image above as a guide. The center line is vertical and about a third of the way from the left of the head circle. At the bottom of the center line just below the circle it bends at an angle to the left. The eye line is not a horizontal. It starts on the left about a third of the way up and is titled down slightly. When it touches the center line it tilts back up and touches the circle on the right about a fifth of the way up the head circle.

Step 3
Step 03: Now for the jaw and hat outline. You might want to begin this step by drawing the small flat line for the chin at the end of the center line that is titled up ever so slightly. Then we can draw the left jaw line starting just outside the head circle on the left and just above the eye line and coming down to hit the chin. The right jaw line starts from the chin line and is straight, stopping on the head circle on the right where it meets the eye line. For the hat shape you might want to begin on the right side of the head and draw the large “halo” like shape around the top of the head. Then we can draw the two straight lines on the left connecting the “halo” to the jaw line. This will form Trafalgar’s ear for us.

Step 4
Step 04: Let’s zoom in on the face and work on his features in this step. Due to the way Trafalgar’s head is turned everything on the right side of the face will be smaller and have a slightly more squashed appearance following our size and squashing 3D principles. Starting with the eyes, we’ll draw two trapezoid like shapes using the eye line as the top of the eye. The eye on the right will be smaller and not quite as trapezoidal as the one on the left. The left eye is about halfway between the ear and the center line. Inside each eye we’ll draw a half circle for the pupils. Again, the circle on the left will be larger than on the right. Next, we’ll draw the check mark line for the nose that runs parallel to the center line just to the right. The top of the nose will be just above the eye line and touch the corner of the eye on the right. On the center line where it forms the angle, we’ll draw the small curving line for his nostril. Then, draw the longer curving line for the mouth starting on the head circle and ending just below the nose to the right of the center line. Beneath that we’ll add a shorter curving line. Got all that?

Step 5
Step 05: Ok, we’ve got some more major shapes to draw in this step. Let’s start on the left and we’ll draw the forked hair shape just under the hat line and touching the ear. Then we can draw the hook line for the top of Trafalgar’s collar. The hook comes to a point near the middle of the jaw and then the collar moves down vertically. When you’ve got that there’s a small line at the back of the hat shape on the left that connects the hat to the curve of the hook. On the right we’ll draw the other side of the collar. It starts at about the eye on the jaw line and is titled down more than the hook line on the left. The point of the collar on the right is slightly higher than on the left. Lastly, we need to draw the irregular shape for the bill of his hat. Use the image above as a guide for your drawing. You’ll notice that the brim follows the eye line just above it, but the line is soft and wavy instead of straight.

Step 6
Step 06: Zooming in on the face, let’s finish up the facial features. We’ll go from left to right, top to bottom in this step. At the bottom of the forked hair piece we’ll add two small lines. Then, inside the ear shape, we’ll draw the two or three irregular lines for the inner ear. At the bottom of the ear we’ll add the two pill like shapes for Trafalgar’s earrings. Next, we’ll draw his sideburns on the left with a zig zag irregular line. The sideburns stop at the hat almost where the brim begins. Now, for the eyes, it doesn’t seem that Trafalgar is getting enough sleep as he has these deep set eyes. So around the eye shape we’ll draw an angular outline of the eye leaving a little space between the eye and this new line. Do this for both eyes. Then, just to the right of the eye on the left, we should draw the “V” mark and the short dash beneath it for wrinkle lines. Moving down, we’ll draw the curved line on the mouth to give Trafalgar a grin. And lastly, on the chin we’ll draw the irregular line for his goatee.

Step 7
Step 07: Let’s finish up the collar in this step and Trafalgar’s shirt. Starting on the left at the curve in the top of the collar, we’ll draw another hook line down and then extend it inward towards the bottom. Then we can move to the right side of the jaw and draw the “U” shaped line for his shirt and then the second curving line that starts just above it to finish off the collar. Before moving on we’ll add two scars to his neck. One just below the ear, the second one under the jaw. Just on the chin, we should draw two move slightly curving dash marks. Great step, great job.

Step 8
Step 08: Now back up to Trafalgar’s signature hat. here we’ll draw rows of irregular ellipse/circle like shapes on the lower half of the hat above the brim. Start by drawing the larger lower row first and then add the smaller row above that, and so on until you’ve got the hat circles the way you want them. Before moving on to our final lines we should add the line and the marks to the brim of the hat.

Step 9
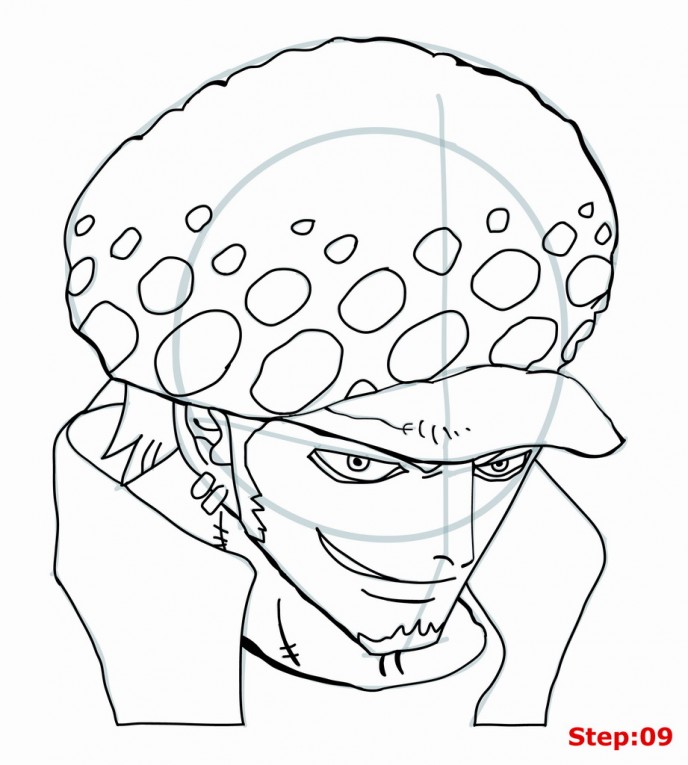
Step 09: Now, take out your eraser and lighten all of the lines we’ve drawn so far. We’ll use our pen to trace our final lines in this step. As you trace your final lines keep in mind that we should make the hat, brim and shirt collar lines a little more crumply and ruffled than the smooth straight lines we made for construction lines. The facial feature lines should be sharp though. Also, I’ve thickened this lines a little bit around the brim of the hat and the top right of the hat, as well as the jaw line on the left and the left side of the shirt collar at the neck.

Step 10
Step 10: Once you’ve got your final outline done and your ink is dry, take out your eraser and completely erase any remaining construction lines that you can see.

Step 11
Click here for more One Piece tutorials
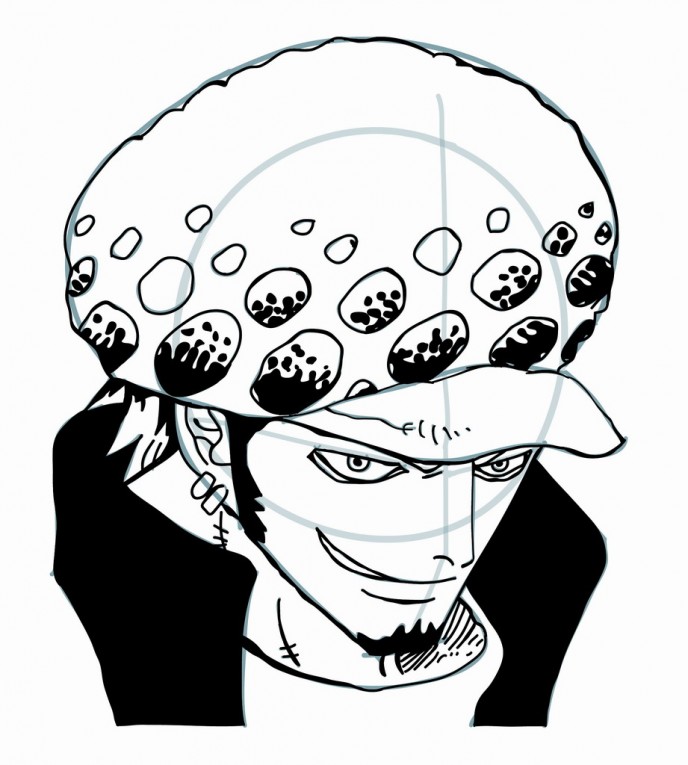
Step 11: We have a pretty good Trafalgar, but I’m going to do some shading and filling to add some depth to the image. I’ve completely filled in the jacket collar, the goatee, his sideburns and top part of the hair fork at the back of the head on the left. Then inside the lower row and some of the upper rows of circles on the hat I’ve done some spotty shading here, the circles aren’t completely filled in. And, lastly, in the right corner of the neck just ender the chin and jaw I’ve drawn some some shading lines that you can do your best to imitate, there’s no perfect way to do it.
Stepping back to take a look, I’ve just finished drawing the competetive Trafalgar from One Piece. If your goal is to become a great mangaka make sure to draw Roy again from memory. Then compare the final drawing with the original and correct any mistakes you might have made. Try once again from memory. This is the best way to build a huge library of shapes and get the tracing experience necessary that you can use in the future for your own manga characters.
Draw with passion! -_^
Hiroshi


3 comments
This site is slowly turning from how to draw manga to how to draw One Piece. But I dont care, I love One Piece
Comments are closed.