Click here for more One Piece tutorials
Hey everyone! We’ve got another requested tutorial today on How to Draw Manga in 3D, Brook from One Piece, goes out to tarun. With Halloween just around the corner, Brook seems like a perfect tutorial to draw. Half-rock star, half-undead skeleton Brook was found by the Straw Hats Pirates and became the team’s musical star. Brook is a really fun character to draw with a few crazy shapes, I’d give it about an average difficulty rating. If you’re interested in learning how to draw other One Piece characters just click on the One Piece tag in the tag cloud at the right for all of our One Piece tutorials. You can also request your own favorite character by clicking on the ‘Request Tutorial’ link at the top of the page. Let’s get our materials ready and learn how to draw Brook.
Step 1
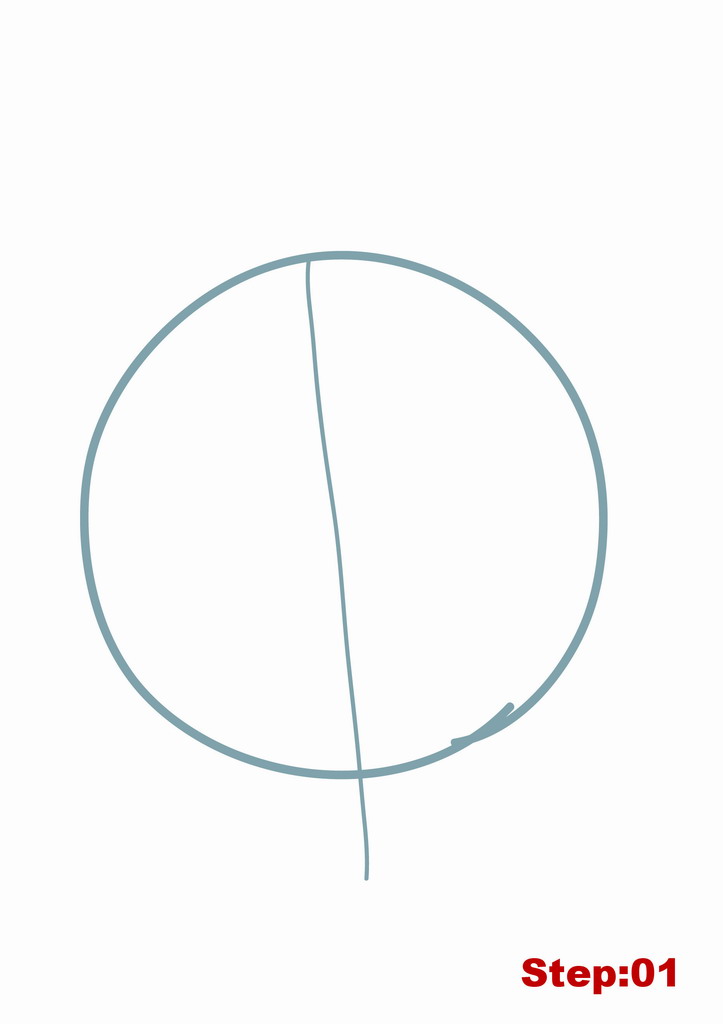
Step 01: All of the blue lines you see in the tutorial are only construction lines and will be erased later on, so don’t press too hard on your pencil. Our final lines will be in black towards the end of this tutorial.
Let’s start with our head circle and center line. Actually, the head circle is really for Brook’s hair but we’ll call it the head circle for the sake of consistency. In the center of our paper we’ll draw a fairly large circle. As it can be hard to draw a circle free hand it might be a good idea to go around very lightly a few times with your pencil to get a circle outline and then draw your head circle on top. Next, we’ll add our center line. As you can see in the image above, the center line is titled slightly to the left and isn’t exactly in the center. It also extends down below the head circle slightly.
Step 2
Step 02: Great, now let’s start up at the top of the head and do Brook’s hat. We’ll begin with a center line for the hat which should be a little to the right of the center line for the head and also it should be straighter. Once we’ve got that, we’ll draw the square shape for the bucket of the hat. It should be a little wider at the top than on the bottom. And lastly, we’ll draw the two small rectangles on either side of the bucket for the brim. Moving down, we’ll draw the two lines on the head center line that will help us to draw in Brook’s face. As we said in step one, the big circle is actually for his hair, so we’ll have to add the face and outline of the face. The upper line is about a quarter of the way down the center line inside the head, while the second line is a little more than halfway down the center line and curves up slightly at the ends. Before moving on, let’s add the “<“, “>” shapes for his shoulders.

Step 3
Step 03: So let’s move inside the head circle to draw the outline of Brook’s face. Starting on the second, lower line we’ll draw an oval shape that touches the ends of our lines on the center line and stops on the second, lower line on the right. Then from the corner of the second line on each side, we’ll draw a line that curves outward from the center slightly down to the head circle. In the end, the outline for Brook’s face should look like the top of a pawn piece in chess.

Step 4
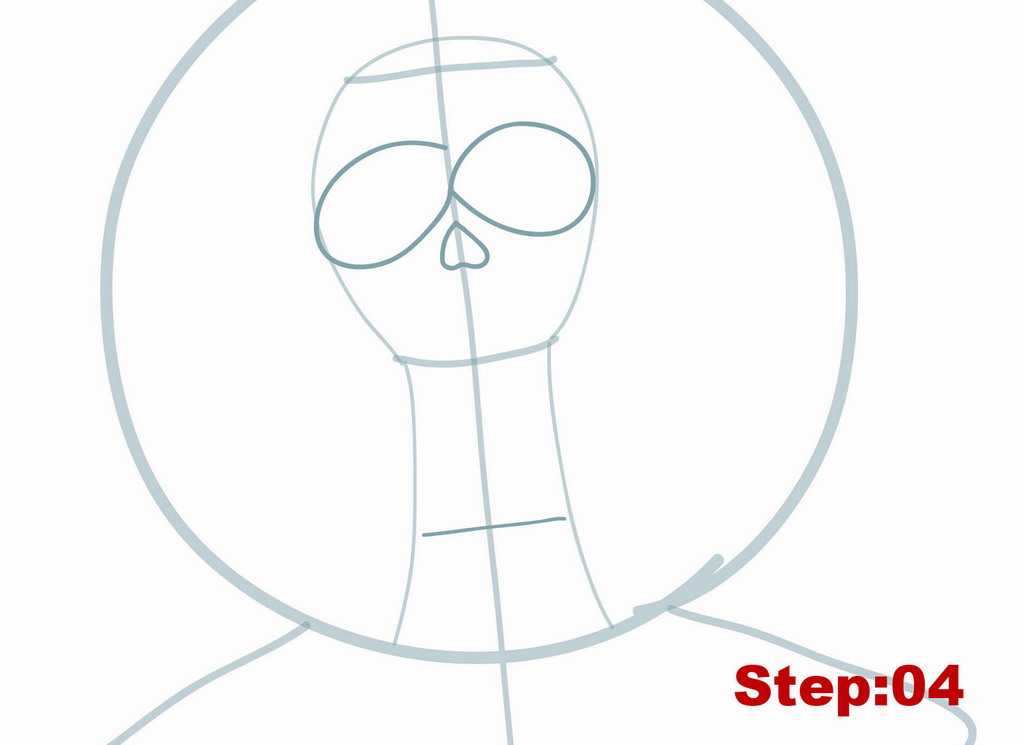
Step 04: Sticking with the face, let’s add the eyes, nose and a line for the mouth. The eyes are quite large and almost form a figure “8” except that the eye on the left isn’t completely closed but stops on the center line. The edges of the eyes should just reach to the outline of the face. Then, on the center line we’ll draw and upside down heart shape for the nose, just beneath the eyes. Lastly, we’ll add a horizontal line on the center line to mark Brook’s lower jaw. The line should be about a little lower than halfway between the bottom of the head circle and the second line we drew in step 02.
Step 5
Step 05: Continuing with Brook’s facial details here. Let’s add two ellipses to each eye socket for his eyes. Then, we’ll draw the rest of the upper jaw by drawing a rectangle with slightly rounded edges on the second, lower line we drew in step 02. Moving down to the line we just drew in step 04, the lower jaw line, we’ll start the lower jaw by drawing a thin horizontal ellipse. Then add a line on each side coming off of the outer corner of the ellipses moving down and outward slightly. Finally, from left to right draw a line curving downward slightly connecting the ends of the lines we just drew on either side of the ellipse. When you’re finished we should have a nice 3D shape for the lower jaw.

Step 6
Step 06: Well, mangakas, there are a lot of irregular lines and shapes in this step. My best advice is to use the image above and do your best to copy what I’ve drawn. I’ll give you some pointers to help you out though. We need to make Brook’s cheeks and top of the head less round and more bony, we should also add the the small spikes to the top of the head. Starting from the left eye, we should draw the irregular line around the top of the head. It firstly, comes to a point on the forehead line. From there across the top of the head to the forehead line on the right we need to draw the little hair spikes. And then, another irregular line from the forehead line on the right side down to the eye on the right. Before moving lower, don’t forget to add the squiggle line starting on the left where the forehead line meets the outline of the face. This is for the crack in his skull.
Now, below the eyes we need to draw a can opener like shape on both sides of the head connecting the bottom of the eyes to the middle of the upper jaw. Once you’ve got that we’ll draw two lines, one on either side of the center line, connecting the upper to the lower jaw. The line will fan out ever so slightly as it moves down. To finish off this step, we’ll draw the soft upside down triangle shape for Brook’s chin just below the lower jaw. The point of the chin should overlap the bottom of the head circle.

Step 7
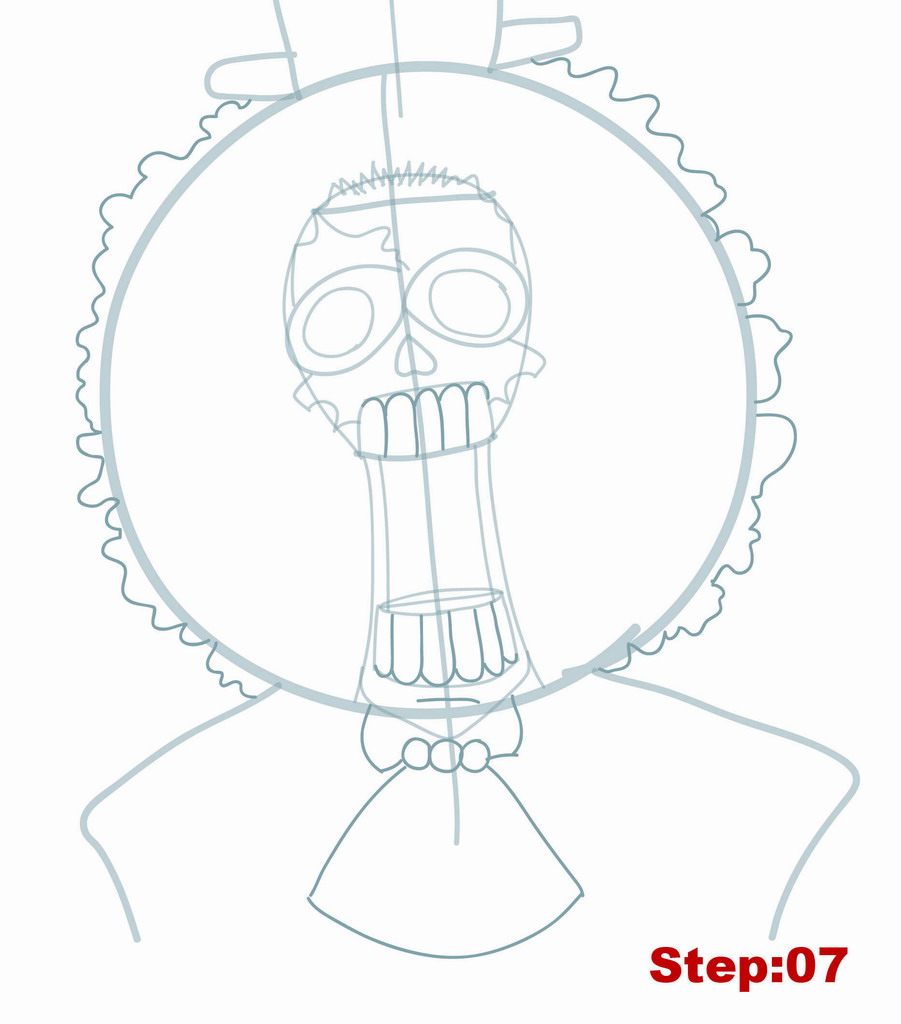
Step 07: Teeth, hair and tie make a good combo in this step. Let’s start with the hair. We need to draw lot’s of irregular puff like shapes and squiggly lines around the outside of the head circle for Brook’s hair. Again, I recommend taking a look at the image above as a guide. The hair lines should end at where the shoulder meets the head circle on either side. In the end, Brook’s hair should look a bit like a head of broccoli or parsley ^_^. Next, we have to add teeth to the jaw shapes we’ve drawn. Inside each jaw, top and bottom, we need to draw “U” shapes for Brook’s teeth. There are five teeth in the top jaw and six in the bottom jaw. There’s a small line just below the lower jaw, in the chin area for his chin dimple. The right side of the line dips down slightly.
Now, let’s move down and draw Brook’s tie. We’ll start with the three circles for the buttons on his tie. The center circle is largest and it sits just a little left of the center line right below the point of the chin, then add one slightly smaller circle to either side. We need to connect the outer circles to the bottom of the head circle making a bow tie shape. And, lastly, we’ll draw the curving triangle like shape for the lower part of the tie.
Step 8
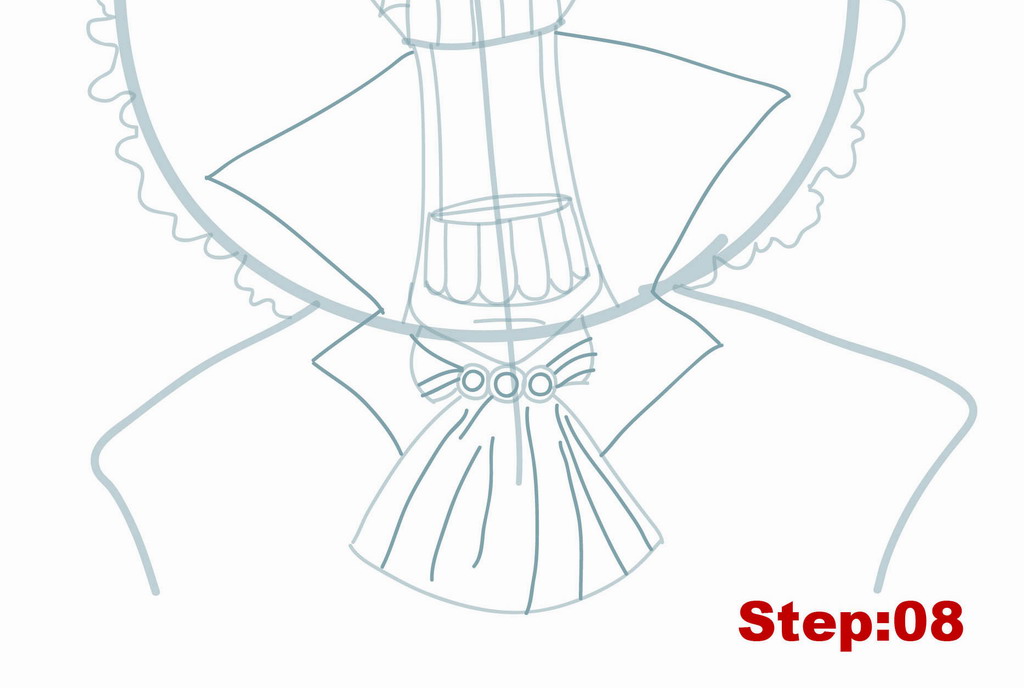
Step 08: Let’s hang around the neck and tie area in this step. We can start by drawing the large “<“, “>” shapes from approximately the bottom of the upper jaw down to the head circle, on both sides of the head. Then beneath that, we’ll draw two smaller “<“,”>” shapes connecting the bottom of the head circle with the bottom of the tie. These are for the collar of his shirt. Once you’ve got that, we’ll turn to the tie, where we’ll draw smaller circles inside each of the three tie circles we drew in the previous step. We’ll also add some lines to suggest creases and wrinkles in the tie. On the bow part, the lines should be more horizontal, while on the bottom part they will be vertical.
Step 9
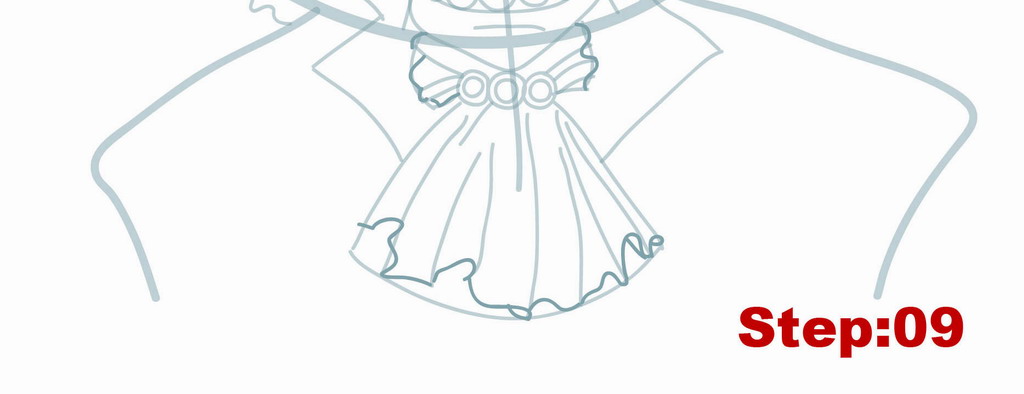
Step 09: With some Manga characters it’s the hair that’s the touch part, with Brook it’s the tie. We’ve got to make the edges of the tie seem more frilly and irregular than the smooth shapes we’ve got now. Imagine something like the 18th century. So around the outer edges of the tie shape we need to draw irregular lines that connect the lines we drew in the previous step and some of these lines can overlap. There’s no 100% right way to do this, so give it a shot and if you’re not happy, no worries, just use your eraser and try it again. When you’re satisfied with the tie we’ll move on to our final lines.
Step 10
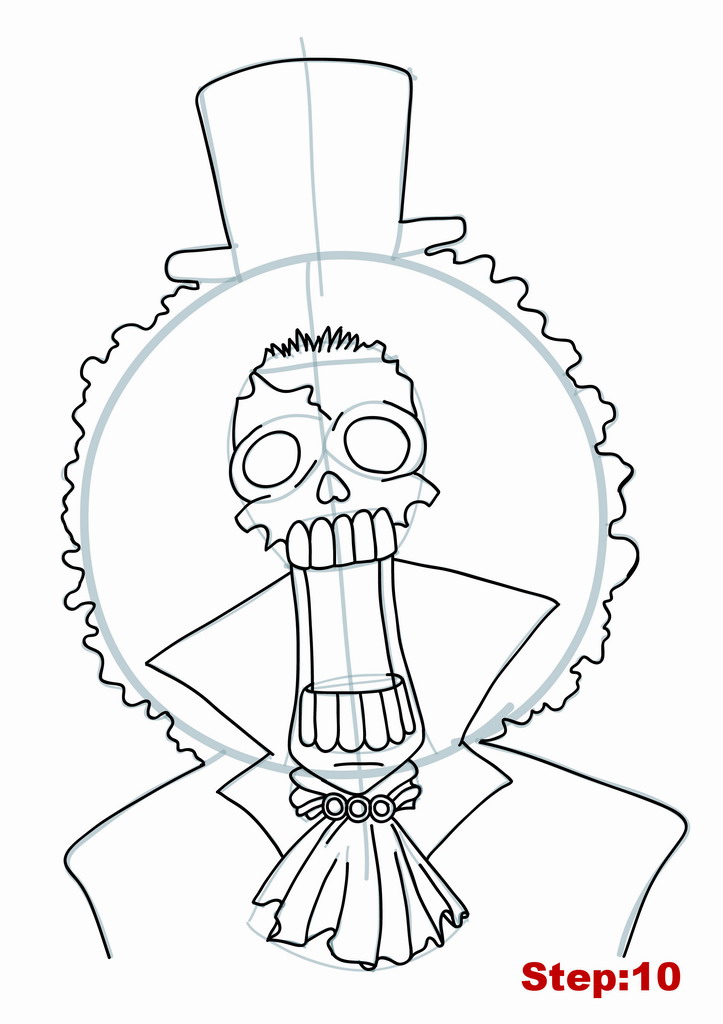
Step 10: That does it for our construction lines. Use your eraser to lighten all of the lines we’ve made so far. Then take out your finishing pen and trace out your final lines. Here are few places to be careful about. Firstly, on the face notice that we don’t completely trace the outer orb of the eyes, that is the figure 8 shape, but only a few spots of it. Also, we only trace the irregular outline of the head including the can opener cheeks. You’ll also notice how the hair lines meet both the hat at the top of the head and the shoulders at the bottom of the head. The line remains continuous and we don’t trace the whole bottom of the brim of the hat. Once you’ve got your final lines in place we’ll do some filling and shading in the next two steps.
Step 11
Step 11: Before we do our inking, let’s completely erase any remaining construction lines we can see. You could stop here and have a pretty good Brook, but he still looks rather flat to me. So I’m going to do some filling and shading.

Step 12
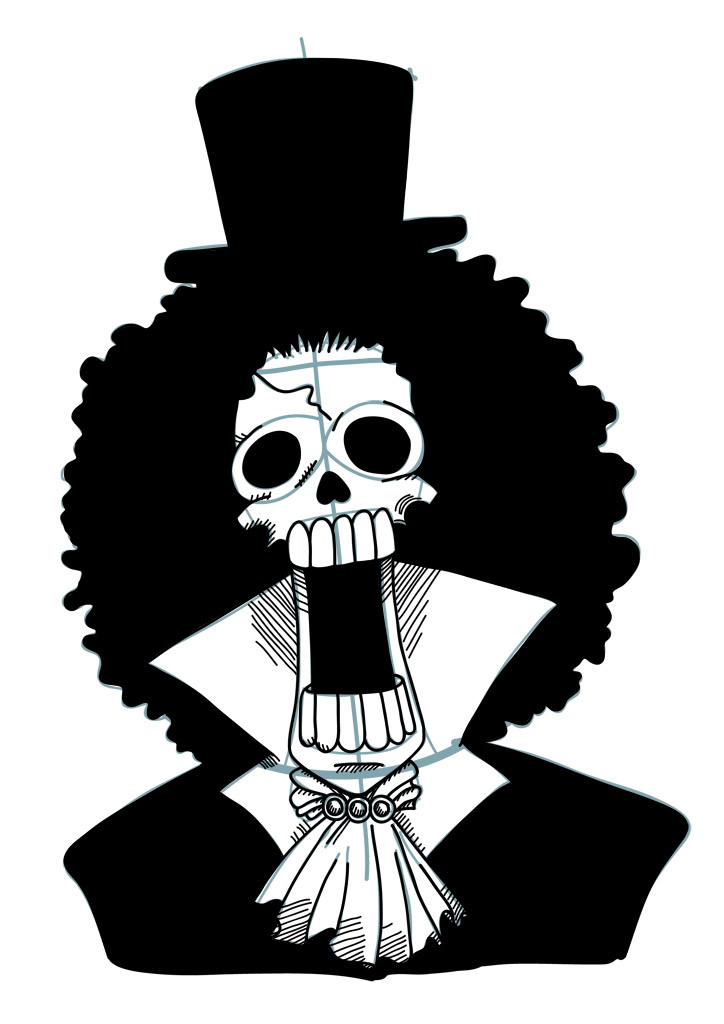
Step 12: Using my finishing pen, I’ve completely filled in Brook’s hat, hair and jacket/shoulders except for the tie and collar. I’ve also completely filled in the space in his mouth between his upper and lower teeth, his nose, and the inner circles of the eyes. Now, he’s got a much better skeleton look to him, wouldn’t you say?

Step 13
Click here for more One Piece tutorials
Step 13: As a last step, I’ve done a little bit of shading. You might want to use a ruler here to keep your shading lines nice and straight. To shade, you just need to draw some very thin diagonal lines in the area you want shaded. I’ve shaded a little below the corners of the eyes, the bottom of the cheeks, the top part of the collar, just below the chin dimple, and around the tie and the bottom ends of the tie.
When you’re all done shading, just wait for your ink to dry and take a look, you’ve drawn Brook from One Piece! If your goal is to become a great mangaka make sure to draw Brook again from memory. Then compare the final drawing with the original and correct any mistakes you might have made. Try once again from memory. This is the best way to build a huge library of shapes that you can use in the future for your own manga characters. Draw with passion! -_^
Hiroshi






3 comments
Comments are closed.