

Click here for more Naruto tutorials
Hi Everyone!!! Today on How to Draw Manga in 3d we’re going to draw Kakashi, one of the coolest Naruto characters ever! ^_^ If you’re interested in learning how to draw other Naruto characters, click on the naruto tag in the tag cloud on the right for all of our Naruto drawing tutorials. The leader of Team 7 may not look like much at the beginning of the Naruto Manga only to surprise everybody with his real strength and superior Sharingan technique. This is Kakashi’s picture from Anime, so there are many more details and therefore this tutorial is recommended for slightly more advanced manga artists ^_^
Step 1
Step 1: We’ll start drawing Kakashi by drawing a circle in the middle of the paper. DonÂ’t push too hard on the pencil as this is just a construction line and will be erased later on as all blue lines in this tutorial will be. Remember to leave enough free space around the circle to draw the rest of Kakashi’s face and his gigantic wave of hair.

Step 2
Step 2: As we continue with our construction lines, we’ve got to draw the center and eye lines. The center line should be slightly right of center as Kakashi is looking in that direction and the eye line should divide the head circle in half. Make sure the construction lines are longer than the circle, especially the bottom of the center line.

Step 3
Step 3: Now let’s connect a point on the center line with the head circle on the left to create a jaw shape. The distance from the head to his jaw is about half of the head circle.

Step 4
Step 4: If you nailed the last one then this step won’t be hard. We’re going to do the same thing but this time on the right side. We now have the main head shape finished. Great work!

Step 5
Step 5: Moving right along, we’ll continue by drawing Kakashi’s head band. As you can see it looks a bit like a bent rectangle and takes up most of the upper head/forehead area. We should make our construction lines slightly wider than his head and the top and bottom lines dip in the center. The top line should be just below the point where the center line and the head circle meet.

Step 6
Step 6: Connect the ends of the head band with the points on the jaw line slightly under the points where they connect to head circle on both sides. Cool, Kakashi has ears now ^_^.

Step 7
Step 7: Time for hair! -_^ Some of these guys must pay their barber a fortune to cut all of their hair! This shape here is somewhat irregular so if you’re not immediately satisfied, erase and give it a second shot. Let’s block the hair square like hair shape, which as I said is freaking huge. The shape should be slightly rhomboid, like a squat square tilted to the right. The distance from the top to the bottom point (touching the ear) is about the same as the distance from the top of the head to the bottom of Kakashi’s chin. Before wrapping up this step don’t forget to draw Kakashi’s neck too. A straight line frrom the ear on the left and a shorter line that curves out on the right.

Step 8
Step 8: In the next few steps we’re going to be drawing in some construction line details. Here, we’re working on the eyes, so draw his eyes on the eye line with the eye line passing directly through their exact centre. Also, we’ll také this time to draw the line for the top of Kakashi’s mouth mask. It should look like a bell curve with the ends crossing the head circle and just touching the bottom of the ears and the top of the neck lines.

Step 9
Step 9: We’re about half-way there. This step will contain a lot of details as we bring out Kakashi’s facial features. Let’s begin by drawing the irisis and pupils first, and don’t forget about Kakashi’s Sharingan in his eye on the right. Next we’ll add wrinkles under the eyes and eyebrow lines just above the eyes that curve upward toward the middle and nearly touch the center line. Then we’ll move to his nose and draw the outline of the shadow cast by Kakashi’s nose on his mask. Lastly, a couple of squiggle lines will be drawn to add some details inside the ears on bothe sides. Excellent work so far, we’re just beginning to see the real Kakashi!

Step 10
Step 10: If you managed the last step then the next few should be a breeze. Here, all we have to do is draw the metal plate inside Kakashi’s headband. The edges should be a little rounded instead of points.

Step 11
Step 11: Another super easy step ^_^ Let’s draw the center line for the metal plate.

Step 12
Step 12: Now, go ahead and draw the small circle with the diagonal line crossing the centre point on the plate we just made in the last step. This will help us to draw the Hidden Leaf village symbol in the next step.

Step 13
Step 13: Great so far. Now to detail the leaf symbol by using a spiral shape in the center of the circle we made in the last step and extending a little triangle whose apex will be at the end of the line on the left. Before finishing up this step add the five small circles for the bolts in Kakashi’s plate.

Step 14
Step 14: Now that we’re mostly done with the face, it’s time for the body. We’ll draw a half circle touching the bottom of the eyebrows. This construction line will help us to locate Kakashi’s jacket later. Also, feel free to lighten any or all of the construction lines we’ve made so far. Don’t erase completely just lighten them a bit with your kneedable eraser if you want.

Step 15
Step 15: Let’s do a little work on the hair again. We’ll draw two icicle like shapes on either side of the head below the band and just next to the ears. Two spikes on the right below the ear and three on the left should do the trick. We should also Kakashi’s scar under the eye on the right using just a straight line and two spikes on the edge of the metal plate on the left of his head band.

Step 16
Step 16: We’re going back to Kakashi’s jacket for the next steps. Here, draw a line with two curves for the edge of the jacket on the right.

Step 17
Step 17: Ok I hope you’re ready for this one as we’ve got a lot of details in this step. We’ll start by drawing the jacket’s collar with two curved lines on either side. On the right the inner line of the collar touches the top of the mask on his face. Next we’ll put in two smaller curving lines to show the seam of the collar. Next we can add the lines on the right below the collar that suggest his shoulders. And finally a line under the chin and the outline of the shadows that are located under Kakashi’s chin and on the left side of the neck.

Step 18
Step 18: Time for more hair! ^_^ Feel free to lighten any construction lines for the jacket we just drew in the last step. Here, we’ll draw Kakashi’s crazy spiky hair inside the rhomboid hair shape we made in an earlier step. The spikes should just touch or overlap the construction shape. If you’re not satisfied with your first attempt, erase and try, try again!

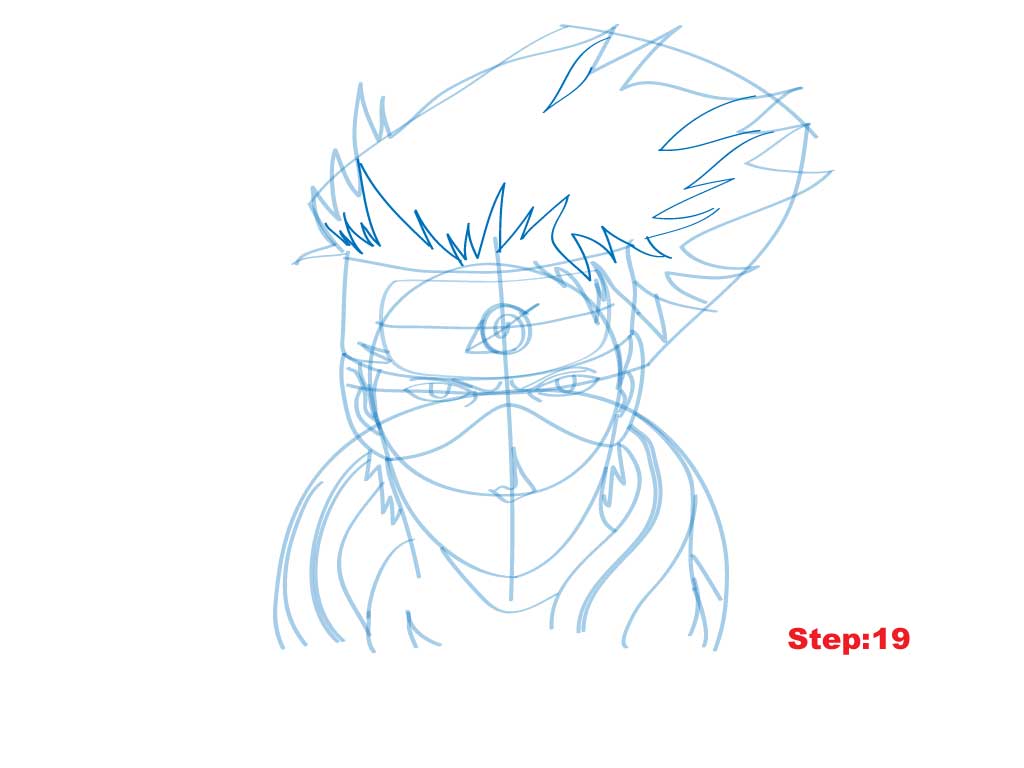
Step 19
Step 19: Sometimes it feels like you’re never done getting ready in the morning, and Kakashi must feel the same way getting his hair in place. In this step we will draw a second layer of spikes inside the hair spikes we drew in the last step. We also need to draw the top rim of the metal plate and add a small lightening bolt line just to the right of the leaf shape that will outline the shape of the shadow for us. You’ve made it, after finishing this step we’ll have all of our construction lines in place! -_^.
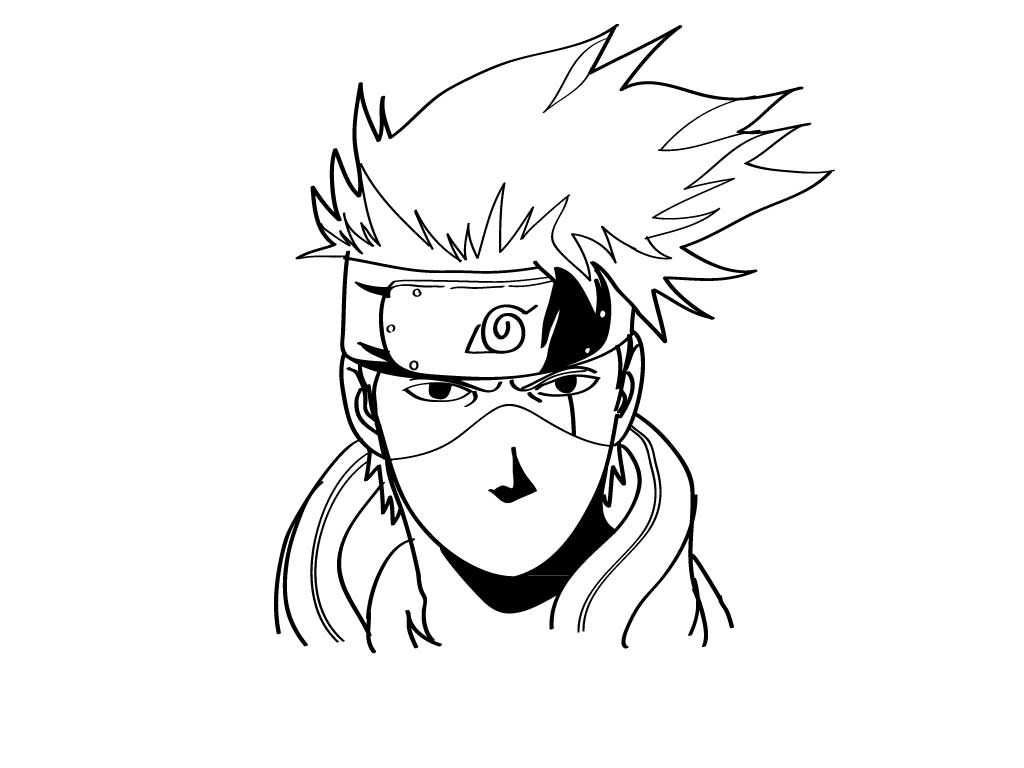
Step 20
Step 20: Erase all the construction lines with your kneedable eraser so they are barely visible. Now, take out your black pen and begin to draw the final lines in black. I’d recommend using two kinds of black pen in this one if you have them, because the hair and eye details as well as the details on the metal plate and jacket collar should be slightly thinner than the bolder face and outer hair and jacket lines. You can also just press more lightly to get a finer line.

Step 21
Step 21: We’re just a step away!! ^_^ In this step, we have to fill in the shadows on the metal plate on the head band, the two spikes on the left of the headband, under the chin and to the left of the neck. This is an example of our shading 3D principle. Also, his left eye should be almost completely filled in in black except for a tiny spot.

Step 22
Click here for more Naruto tutorials
Step 22: Great job, everyone!! Go ahead and erase any remaining construction lines you see completely. That’s it, and you’ve got Kakashi! -_^. If your goal is to become a great mangaka make sure to draw Kakashi again from memory. Then compare the final drawing with the original and correct any mistakes. Try once again from the memory. This is the best way to build a huge library of shapes that you can use in the future for your own manga characters.
Draw with passion! -_^
Hiroshi


10 comments
In the beginning of the drawing, i was thinking omg, i’m doing something wrong, but i didn’t. It turned out so awesome 😀
Thank you! 🙂
Comments are closed.