

Hey Guys! We’ve got a great new tutorial for you today, it’s Ino Yamanaka from Naruto requested by user LolPickleMan. Hope you like it, and make sure to post your finished drawing in your user gallery to share with others and get feedback on your drawing progress. Some quick background. Ino is a member of Team Asuma and her powers range from a Mind-body switch power that enables her to take control of another person’s mind to a magical healing power, pretty cool. She has a strong attachment to the color purple as her master wanted her to represent the power of the flower called a violet in English, and we’ll see this later on in the colorizing step as she almost always wears a purple shirt. She’s always had a crush on Sasuke, even after he’s declared a world enemy and switches to the dark side. She’s got quite a life ^_^! If you’ve missed any of our other Naruto manga drawing tutorials you can check out a complete list here. You can view an enlarged version of any image by clicking on it. You can also view the tutorial as a slide show without text by clicking on an image and then clicking the left and right arrows at the bottom of the image to change steps. I’ll be doing some colorizing in the last step of today’s tutorial and you can too, or you can just do some shading in grey if you don’t have colored pencils, markers or paints available. Ok, let’s get our materials ready and learn how to draw Ino!
Step 1
Step 01: Just a reminder to all of our mangakas that all of the blue and green lines you see in this tutorial are only construction lines and will be erased later on, so don’t press too hard on your pencil when drawing these lines. Our final lines you’ll see in black at the end of the tutorial. We’re going to begin with our head circle, center and eye lines.
Let’s start by drawing a large head circle in the upper-center of our paper. We want to be sure to leave enough room around the head circle for Ino’s hair and her neck.
Pro Tip 1: When drawing your head circle go around a few times very lightly with your pencil to get a nice outline of a circle, as it can be quite hard to draw a circle free hand. Then trace your head circle over the outline you have made.
Next, we’re going to draw our center and eye lines. The center line is vertical and is shifted just slightly to the left of center. Our eye line is horizontal. We also want to add a small dash mark towards the end of the center line to help us mark out where the chin will be (the green dash). Then we’ll add the center and eye lines, and the small chin dash (the green dash near the bottom of the center line in the image above). Due to the way we have Ino posed we need to adjust our center line a little bit. Instead of a straight vertical, we should draw a line curving slightly to the left through the middle of the head circle. It should extend a little above and quite far below the head circle. The eye line is a flat horizontal that is titled upward slightly.
Pro Tip 2: Measurements: The eye line starts on the left of the head circle between 1/6 and 1/7 of a head circle up from the bottom of the head circle. The chin dash on the center line is a bit more than 1/2 a head circle from the intersection of the center and eye lines.

Step 2
Step 02: I’ve labeled all of the lines and areas with numbers in the order they should be drawn. I’ve also included a “clean” final version of each step afterwards. So, here, we’ll begin with the jaw line on the left and right (lines #1 and #2). Make sure to begin where the eye line meets the head circle and draw the soft curve down to the chin dash on the center line. Line 1 is a little wider than line 2 making the jaw on the left a little wider than on the right. Next, (#3) we’ll draw the tops of the eyes which are like upside down curved check mark shapes. They start on the eye line and finish above it. Lastly, (#4) we’ll draw the mouth line curving down just noticeably on the right and, above that inside the head circle, two little dashes for her nostrils. That’s it.

Step 3
Step 02: Here you can see what your final version of step 02 should look like.

Step 4
Step 03: Now, we’ll begin this step by drawing the long curving line from the top of the head circle on the left (line #1) all the way down past the jaw, touching the corner of the eye on the left on the way down. This will form part of a hair segment in our next step. Jump over to the right, and we’ll draw the irregular “c” shape for the ear (line #2). Notice that the ear starts on the eye line just inside the head circle and finishes on the jaw line. In area #3 we need to draw the two wavy lines above the eyes for the eyebrows. On the left, the eyebrow begins on line #1 and stops just before the center line. On the right, we see the whole eyebrow. To wrap up this step we just need to draw the neck lines (area #4). The line on the left is closer to the chin, slanted more and curves at the bottom more than the neck line on the right. The neck line on the right is quite high up on the jaw line just below the ear.

Step 5
Step 03: Here you can see what your final version of step 03 should look like.

Step 6
Step 04: We’re going to zoom in on the eyes and ear here, so you can clearly see the details we need to add to these features.
Eye on the left: We’re going to begin with the eye on the left. Let’s start by drawing the parallel eyebrow line just below the one we drew in the previous step. Then we’ll move down to the eye itself and draw the slightly wavy lower lid line. Next, we can draw the “(” and “)” shapes for the iris between the top and bottom lines. Next, draw the hook like shape that overlaps the iris we just drew. Then, lastly, the check mark line just over the left corner of the eye.
Eye on the right: Again, start with the parallel eyebrow line. Then add the lower lid line. Next, the half circle for the iris. The hook line that crosses the iris is next. Then, lastly the line over the right corner of the eye that ends in a squiggle.
Inner Ear: The easiest way to draw the inner ear is to start with a long wavy “s” line. Add the “c” shaped line to form the inner ear. Then you can add a few marks on the “s” line above that. Lastly, draw the earring. Start with an almost complete ellipse shape and then add the smaller second line. That’s it for this step!

Step 7
Step 04: Here you can see what your final version of step 04 should look like.

Step 8
Step 05: Time to outline some parts of the hair and Ino’s trademark purple shirt. We’re going to break one of our drawing rules a little bit. Remember we should always try to draw from top to bottom and left to right but line 2 and line 3 don’t really touch anything we’ve already drawn so I’m going to start with the lower bang line #1 since it starts on the long vertical hair segment line and touches the center line. We want the bang line (#1) to form a little arch across the forehead. On the right near the head circle line, the bang line will stop and drop down to touch the point where the eye line, head circle and jaw line all meet. Then, we can more easily draw the diagonal line #2 that starts above the head circle and stops on the center line where the bang line meets the center line. Line #3 goes from line 2 all the way around just above the head circle to stop on the top of the ear. In area 4 we’re drawing the top of Ino’s shirt and finishing the neck. Begin by drawing the wavy “U” line from the middle of the neck line on the left all the way around to touch the bottom of the neck line on the right. Then add the wavy shoulder line on the left that starts just above the “U” line we just drew. On the right, just below the “U” line there’s another line to add. And, lastly, a diagonal on the neck to suggest the neck muscle.

Step 9
Step 05: Here you can see what your final version of step 05 should look like.

Step 10
Step 06: (1) Begin by drawing the half circle shape on top of the hair at the top of the head for Ino’s bun. (2) Next, we’ll finish the hair segment here on the left. (3) Once we have 2 done, we can add another, slightly shorter, hair segment coming off of this one and ending in the spike at the end. (4) The last thing to do here to finish the hair is to roughen up the bang line to make it zigzag instead of a flat straight line. Then, you can add all of the little lines inside the hair making sure to get the lines under the long hair spike. That’s all for this step.

Step 11
Step 06: Here you can see what your final version of step 06 should look like.

Step 12
Step 07: That does it for our construction lines for the moment. But keep your pencil handy as we’ll need it soon for shading and coloring ^_-! Take out your finishing pen and trace your final lines in black.
Pro Tip 1: At first, just get a nice outline in thin black lines. Don’t worry about filling anything in, or working on line quality, just get a nice thin outline first.
Two Trouble Spots: There are two spots where we want to add a break in our final lines where the construction line was solid and complete. The first spot is the line that separates the two long hair segments on the left. We drew a single solid line to separate them in pencil but as you can see we don’t want to trace the whole line in black. The other spot is a break in the shirt line below the neck.
Line quality: Now that we’ve got a nice thin outline we can go back and thicken some of the lines to make them stand out more. I’ve thickened the bottom of the jaw line near the chin and to the right slightly, the neck line on the right is a little thicker than the one on the left and the outer hair lines should be quite bold. We also want the eyebrows, the upper lids and the irises of the eyes to be very thick. It’s not quite filling them in so I’ve included them here. Ino’s bold eyes are the feature that should stand out the most.

Step 13
Step 08: Give everything a minute to dry, you don’t want to smear your drawing at this point. Then, take out your eraser and completely erase any remaining construction lines that you can see.

Step 14
Step 09: Remember I told you to keep your pencil handy, well, here’s why. If you’re going to be coloring or just shading in grey you will want to do this step and mark out the areas that should be shaded/darker first. Then we can go back and just fill in these areas in grey or in a slightly darker shade of the color we are using for that area. So we want to draw very thin irregular lines that will mark the “darker” areas we’ll shade or color in the next step.
(1) Add the zigzag lines to the hair segments on the left. (2) In the hair area we can mark out some areas with zig zag lines, I’ve added three as you can see. (3) Then, the face. Here we will want to shade or darken most of the far left side of Ino’s face, so I’ve marked that with the long line starting from the middle of the bangs, overlapping the left corner of the eye on the left and then curving to the right to follow the jaw line around to the chin. It should look like a large irregular “c” shape. Then, we’ll add the irregular shape under the inner corners of both eyebrows. Another irregular shape around the nostrils. And, lastly, inside both eyes we can add a small circle in the left corner of the iris and then a line connecting that small circle to the opposite side of the iris. (4) On the neck, there’s a wavy shading line to draw.

Step 15
Step 09: Here you can see what your final version of step 09 should look like.

Step 16
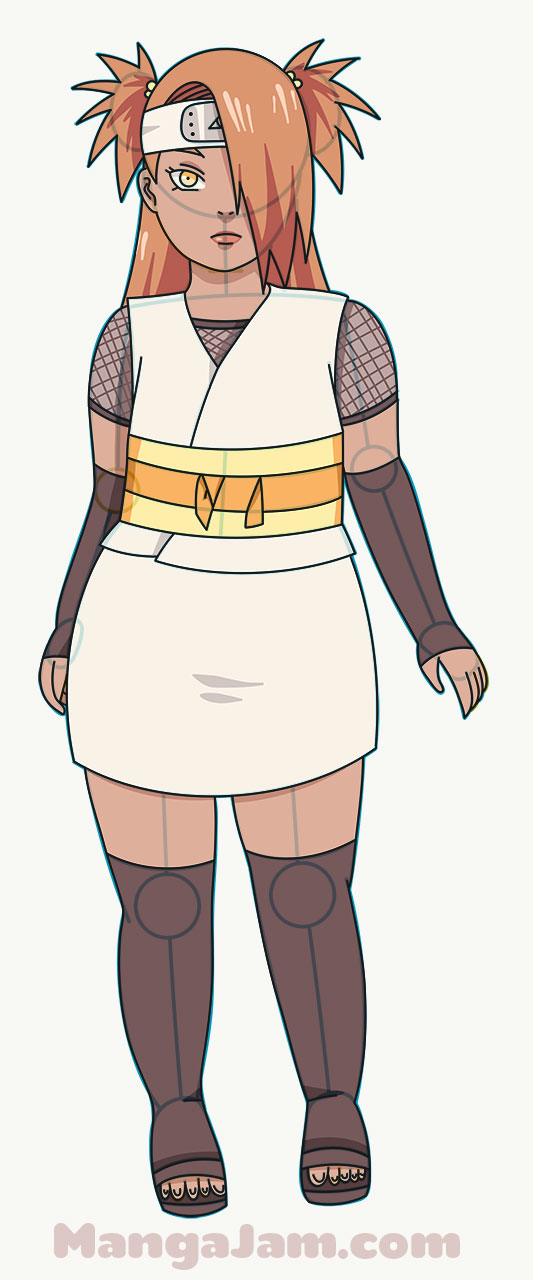
Step 10: If you’re just shading in pencil, then this final step is pretty easy, just shade in the areas we marked out in the previous step in pencil or grey marker. If you’re going to colorize, I’d recommend choosing your palette of colors first, one color for the skin, one for the hair, one for the shirt and one for the eyes. I should have chosen purple for the shirt as that’s her trademark color … sorry for the mistake guys ^_^! Color in the the whole shirt, the whole face and all of the hair first in the same color, and then go over those areas we want to darken again pressing harder to get a deeper and darker version of the same shade.
Once you’ve finished your shading or coloring, give everything a minute to dry and take a look. You’ve just drawn the unrelenting Ino from Naruto! If your goal is to become a great mangaka make sure to draw Ino again from memory. Then compare the final drawing with the original and correct any mistakes you might have made. Try once again from memory. This is the best way to build a huge library of shapes that you can use in the future for your own manga characters.
Draw with passion! -_^
Hiroshi
Text by Locke001
Pls click here for more Naruto tutorials : How to draw Naruto Characters


15 comments
Comments are closed.