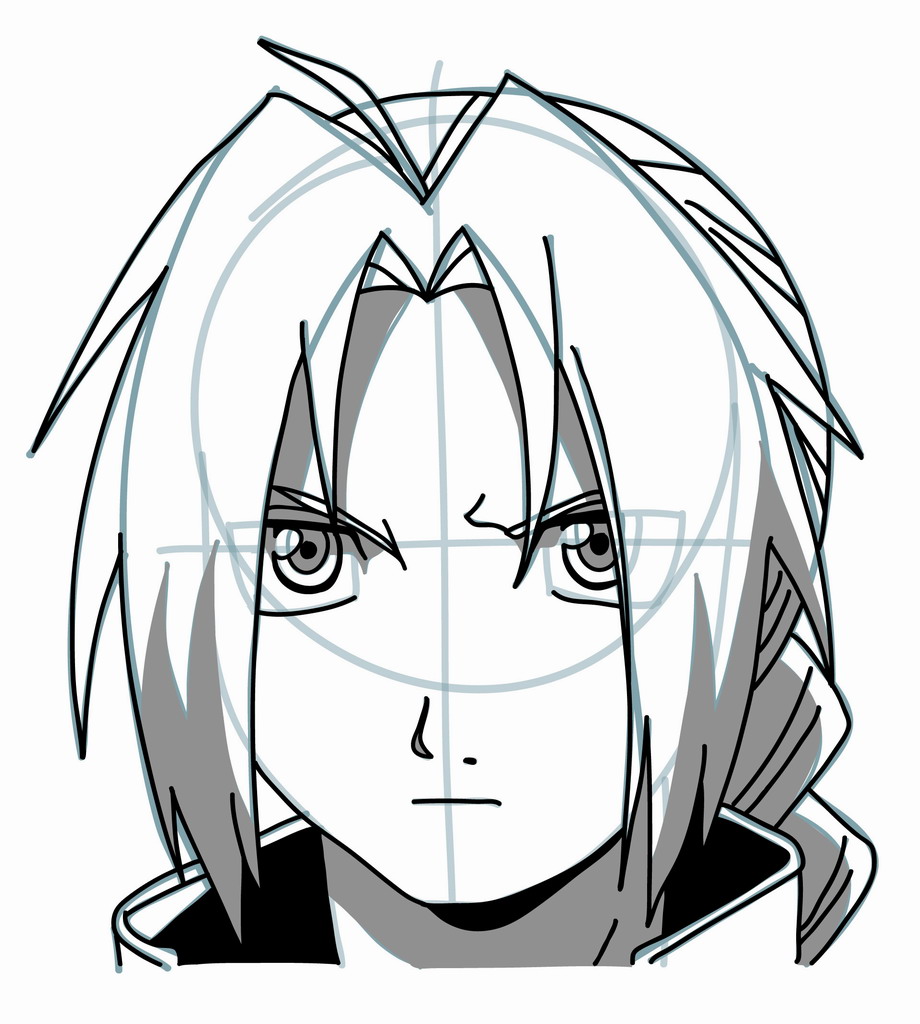
Fellow mangakas, let’s draw! Today’s drawing tutorial on How to Draw Manga in 3D is Edward Elric from Fullmetal Alchemist. A big thanks to Aoi Blue for the request, let me know what you think. Edward is one of the two main characters of the manga, both brothers, who take up the study of alchemy in an effort to bring their dead mother back to life. When this fails and an accident causes Edward’s brother Alphonse to lose his body, it becomes Edward’s goal to restore his brother. And there the action begins ^_^. If you have any requests, be sure to click on the request tutorial link at the top of the page and let me know what you’d like to learn how to draw. We’re going to be doing a little shading in this tutorial so in addition to your pen, pencil and eraser it might be a good idea to have grey marker handy too. Let’s get out our materials and learn how to draw Edward Elric.
Step 1
As all of our returning mangakas will already know all of the blue lines you see in this tutorial are only construction lines and we’ll be erasing them later on. So, it’s important not to press too hard on your pencil when drawing these lines. You’ll see our final lines in black towards the end of the tutorial. We’ll start with a fairly large circle in the middle of our paper. As it can be quite difficult to draw a perfect circle I recommend going around with your pencil a few times very lightly to get an outline of a circle and then draw your actual circle on top of that. It always helps to have a guide ^_^.

Step 2
Alright, mangakas, time for our center and eye lines as well as the jaw. Let’s get started. In the pose I chose for Elric, his head is turned ever so slightly to the left side of our paper so we have to shift everything over slightly. And if we remember our drawing principles we should be aware of the size 3D principle where things that are closer to us appear larger. In Elric’s case, this means that the features on the right will be just slightly larger and take up more space than those on the left.
Let’s start with our center line. It’s a pretty straight vertical that extends down below the head circle but it isn’t exactly in the center but pushed just left of center. Next, we’ll draw our eye line as a typical horizontal about a quarter of the way up the head circle. Next, we’ll draw the jaw and chin. As you can see in the image above the chin is pretty flat, so if you’d like you can draw a short horizontal line below the head circle on the center line and then draw the curving lines from the side of the head to the chin line. You’ll notice that the jaw line on the right is smoother while the jaw line on the left has more of an angle to the curve. Once you’ve got these construction lines in place, we’ll move on.

Step 3
Time to add in some facial features. We’ll begin with Elric’s eyes. They are pretty rectangular but it’s important that the sides of the eyes closest to the sides of the head are wider. Also, as we can see in the image above, the eye on the right is completely within the head circle while the eye on the left overlaps the bottom of the head circle on the left. Furthermore, the eye on the right is slightly larger than the eye on the left following our size 3D principle.
Once you have your mis-shaped rectangles just add a “U” shape inside each to begin with, we’ll add more details in the next few steps. Moving down, we’ll draw the squiggle line just to the left of the center line and below the head circle for Elric’s nose. Next, add the dot for his nostril to the right of the center line. Below the nose, we’ll draw the straight line for the mouth that curves downward just a tad on the right end. Lastly for this step, we should draw the two lines for the neck coming off of the jaw. Please be aware that the neck line on the right is higher up on the jaw than the one on the left which is closer to the chin and shorter.

Step 4
Time to start on Elric’s hair. We’ll begin by drawing the large “M” shaped bangs. The middle of the bangs should be on the center line and you might want to add two small points for the tips of the bangs inside the neck on the right and outside the neck on the left. This way, you can draw the arches down to the points. The bottom lines of the block “M” will be straighter and they definitely overlap the eyes (about half the right eye and a third of the left).
The upper lines of the “M” are not only larger but more curved. Once you’ve got the “M” to your satisfaction, we can draw the curving line for hair on the back of his head starting from near the top of the left leg of the “M” and curving around to touch the right leg of the “M” near the side of the head. Lastly, we need to begin drawing the collar of his jacket. So, let’s add a “<" and ">” shape at the bottom of the head. On the left where the neck meets the jaw we’ll draw our “<", and on the right we'll draw our ">” starting near the end of the right leg of the “M”. You’ll notice the collar doesn’t close in the front and that the point of the “<" on the left is lower than the point of the ">” shape on the right.

Step 5
We’re going to add some more hair in this step and spiff up the collar a bit. For the hair, as usual, there’s no perfect way to do it and you can feel free to try something a little different or experiment in your own way. But here’s a quick guide to my drawing, I’ll go from left to right and top to bottom. So starting on the left leg of the “M” shaped bangs, I’ve added two large hair spikes on the side and two thinner, smaller spikes at the bottom. In the center, I’ve also added two hair spikes, one on each side of the “M”.
The spike on the right is longer and slightly thicker than the one on the right (size 3D principle again at work here). I’ve also added a little collic sprouting up between the arches of the “M”. On the right side, I’ve drawn two more hair spikes to make the hair symmetrical to the left side, and forked the bottom of the right leg of the “M” just like the left leg. Now, we’ll move down to the collar and we’ll draw a second “<" and ">” shape just outside the one we drew in the previous step.
And in the corners of the collar we’ll draw a short straight vertical line down. Not finished quite yet. Now that we’ve got the collar we can add the two “>” shapes on the right side of the hair. These “<" shapes are more curved and softer than those for the collar and they are for his braided pony tail. Great work, everyone.

Step 6
Let’s zoom in on the eyes for a moment and do some work there. Elric’s eyes are a little complicated but we’ll take each step in turn. Inside the large “U” shape we drew in step 3 we’ll add another, though smaller, “U” shape for the iris and a small dot inside that on the eye line for the pupil. The pupil on the right should be a little larger than the one in the eye on the left.
Then, we have to draw the sideways “u” shape in the upper left hand corner of both eyes that just brushes the pupils — this spot will be a reflection spot in the eyes. Then, we can draw the eyebrows. On the left, we’ll draw a strong checkmark shape with a little line in the upper right corner of the eye. Over the eye on the right, the eyebrow is an irregular line (take a look at the image above for some inspiration). Lastly, before moving on, let’s draw the two small “V” shapes under the arches of the bangs with their points on the center line.

Step 7
In this step I’ve just added a few lines to those parts of the hair I thought were just dead white spaces and could use some depth and layers. Feel free to try out your own ideas if you’d like or use the image above as a guide. A couple of dashes can add a lot to your drawing ^_^. One thing we can’t forget to draw are the lines on the eyebrows. We don’t want just simple lines for the brows but a little thickness.

Step 8
Now, take out your eraser and lighten all of the lines we’ve drawn so far. We’ll use our pen to trace our final lines in this step. One important place to pay attention to while tracing is the eyes. As you can see above, the outer part of the eyes are mostly hidden behind the hair arches so there’s no need to trace those. Also, the inner parts of the eyes are unclosed and untraced. Also, when tracing the “U” shape inside the eye be sure to follow and trace the reflection spot.
When you have all of your final lines in place, let’s go back and do a little line quality work on the eyes and some shading. We should thicken the lines that make up the top of the eye. Also, we’ll thicken the larger, outer “U” shape inside the eyes but not the reflection spot. Then moving down, we’ll use our black pens to shade some areas, starting with the area just below the chin and just under the right cheek. When you’ve got that shadow, then we should shade the inner “<",">” shapes of the collar almost completely. You’ll notice there is an empty spot on the tip of the collar on the left. Lastly, there’s a small dash on Elric’s neck that I forgot to add before, feel free to draw it in here in black.

Step 9
When your ink dries, just completely erase any remaining blue construction lines that you can see using your eraser.

Step 10
Elric looks pretty good, but we can make him stand out even more by doing some addition shading in grey. You can use your pencil or if you’ve got a grey marker handy, that works too. Let’s start by using our pencil and we’ll draw some construction lines to outline the area we want to shade. I’ve drawn lines on the ends of the hair, a curving line inside each of the parts of the braided pony tail, the lines on the forehead, a squiggle on the neck and another squiggle in the eye on the left.

Step 11
Then using my pencil or grey marker I’ve filled in the areas outlined in the previous step: the tips of the hair, the area on the forehead beneath the hair spikes, inside the smaller “u” shapes in the eyes, half of the eye on the left and the whole neck except for the small area under the line we drew in the previous step. After all the ink and marker dries, we should erase any construction lines we might be able to see.
Wow, take a look at Elric from Fullmetal Alchemist. If your goal is to become a great mangaka make sure to draw Elric again from memory. Then compare the final drawing with the original and correct any mistakes you might have made. Try once again from memory. This is the best way to build a huge library of shapes and get the tracing experience necessary that you can use in the future for your own manga characters. Draw with passion! -_^
Hiroshi


27 comments
hey guys! ^_^ I am glad you like it, it was lot of fun to draw Edward. I will also put your tutorial requests on the list. We have lot of new requests lately which makes me quite happy actually
I’m really enjoying your tutorials and website–thank you so much for sharing this!
(http://howtodrawmanga3d.com/category/tags/fullmetal-alchemist)
I put my effort up in my gallery, please feel free to comment
Started drawing recently and was just looking for some info on the Web and found this gold piece! Definitely going to stay here for a while.
BTW love the eye details and how you explain it step by step.
I am having trouble with the eyes and the hair.. Could you add another tutorial from that for us beginners? Something like this maybe http://www.painterartist.com/en/pages/draw-manga/eyes/ to show us a step by step 😀 Thanks! And great tutorial doe, I am just a learner so it’s a bit harder for me 😀
why the pict doesnt load ._.
I can’t see the tutorial =/ the pages are blank
Comments are closed.