Hey Mangakas! We are getting more serious on How to Draw Manga in 3D today, no cute pokemon this time but the hardcore demon hunter Vergil! It isn’t all fun and games, only the most brave mangakas should atempt to draw this half angel half demon. No kidding this one is seriously hard! Thanks to Asna13 for the request. Vergil is the twin brother of Dante, who usually is distinguished from his brother by his hair being pushed back and spiky. Also, unlike Dante, Vergil embraces his demonic heritage and is the principal bad guy in Devil May Cry, who tries to raise the Temen-ni-gru by releasing the seven seals. We’ll be doing some shading at the end of our tutorial so it might be a good idea to have a grey marker in addition to your pencil, pen and kneedable eraser. Post your requests by clicking on the “Request Tutorial” button at the top of the page. And be sure to check out your favorite Manga tutorials by clicking on the name of the manga in the tag cloud at the right. Let’s start and learn how to draw Vergil.
Step 1
Step 01: All of the blue lines you see in the tutorial are only construction lines and will be erased later on, so don’t press too hard on your pencil. Our final lines will be in black towards the end of this tutorial.
Let’s begin with our head circle, eye and center lines. Go around a few times lightly with your pencil until you have a nice outline of a circle and then draw your head circle on top of your outline. Once you’ve got that, draw your vertical center line dividing the head circle in two and extending quite far down below the circle. Next, draw your horizontal eye line about a fifth of the way up the head circle.

Step 2
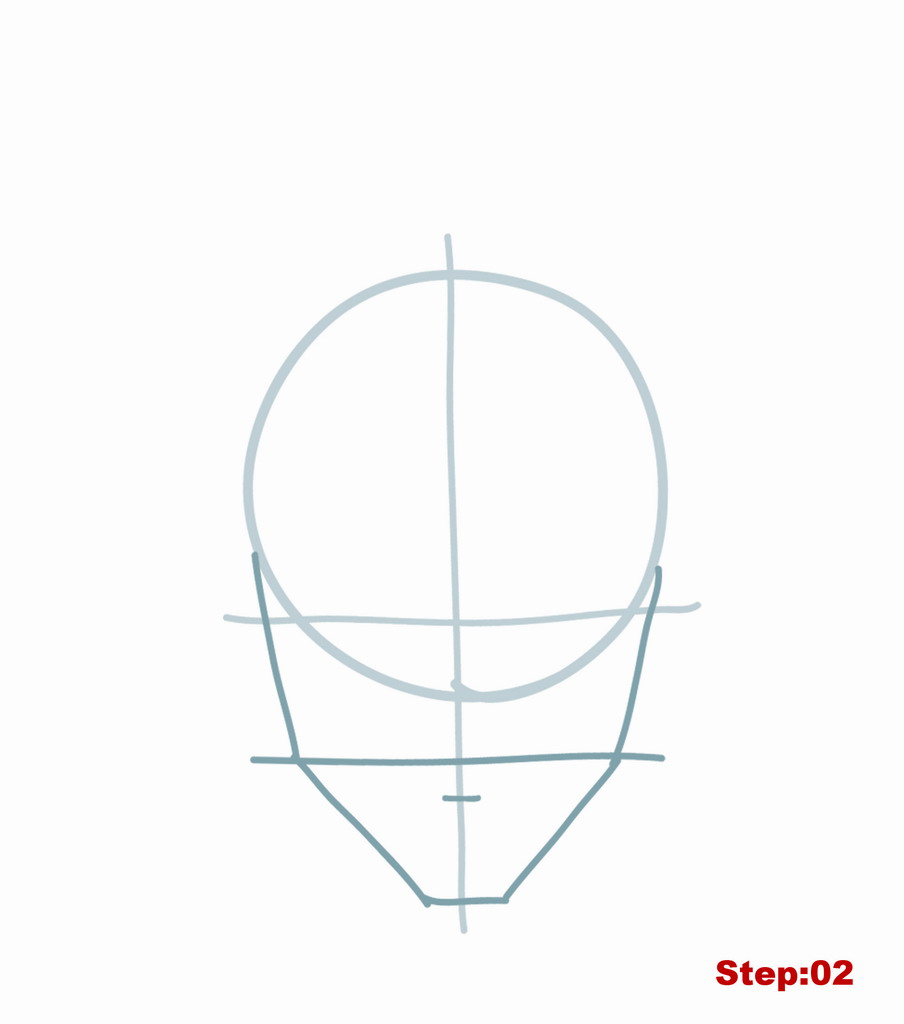
Step 02: Let’s draw Vergil’s jaw in this step. We’ll begin by drawing a horizontal nose line below the head circle. And beneath that we’ll draw a short horizontal line for the chin towards the end of the center line. The space between the nose line to the head circle is about the same as the distance between the eye line and the head cirlcle. Then, starting on the left on the head circle we’ll draw a straight line at a slight angle down to the nose line. From that point, we’ll draw another straight line but with a more acute angle to the chin line. Do the same thing on the right side and we’ve got his jaw/chin outline all done. Before moving on, don’t forget to add the short mouth line about a quarter of the way down between the nose line and chin.
Step 3
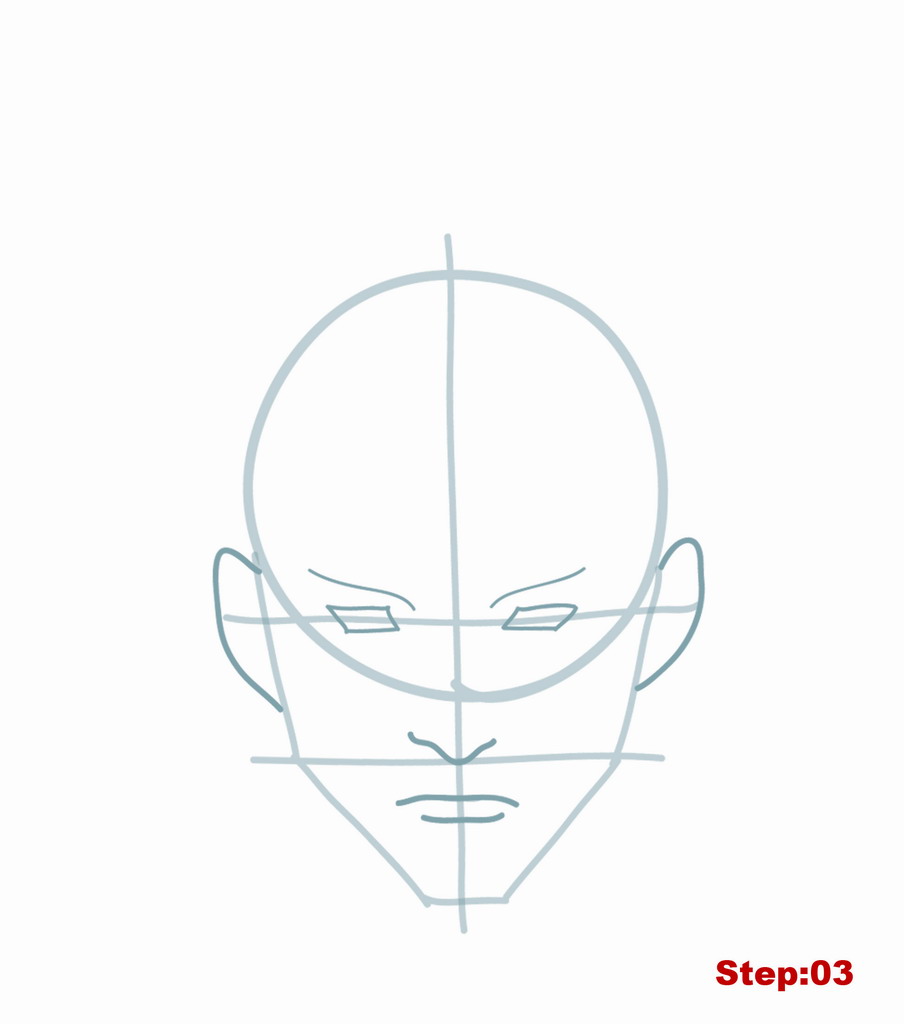
Step 03: Time for some facial features, here. Let’s start with the eyes on the eye line. We’ll draw a rhombus for each eye. Above the eye on both sides we’ll add two slightly curving lines for his eyebrows. Next, we’ll draw an ear on either side of the head starting at where the jaw line touches the head circle, the ear should be a “c” shape with the bottom longer and straighter than a perfect “C”. Next, let’s draw the curving “{” shape for the nose — the bottom of the nose just touches the nose line and the nose is a bit longer on the left than on the right. Lastly, we’ll draw the two lines for his mouth, the upper line is longer and curves down at the edges, the lower line is shorter and curves up slightly at the edge. The upper line sits on the short mouth line from the previous step and is for the line between the lips. The bottom line is for the bottom of his lower lip.
Step 4
Step 04: Well, mangakas, time to start the hair. We’ll also being drawing an outline of Vergil’s cloak in this step. Let’s start with the hair. Let’s draw a line curving down in the middle slightly across Vergil’s forehead. This line will mark where his hair begins. Next, we’ll add the “>”, “<” shapes to either side of the head starting where the ear meets the head circle also for a hair line. Then, we’ll draw seven long leaf like shapes for the first hair spikes. I recommend starting in the center with the longest spike. It’s starts just to the left of the center line. Then, we’ll add three more to the left and three more to the right of center. You’ll notice that the hair spikes closest to the ears don’t touch the hair line we drew but stop on the head circle. Moving down, we’ll work on his cloak. We’ll begin with two soft only slightly curving “S” shapes that start just below the ears on either side and that curve in towards the jaw/neck for the collar. Then, also starting from the ears, we’ll draw the two “{” shapes for the collar of Vergil’s coat moving further away from the center.

Step 5
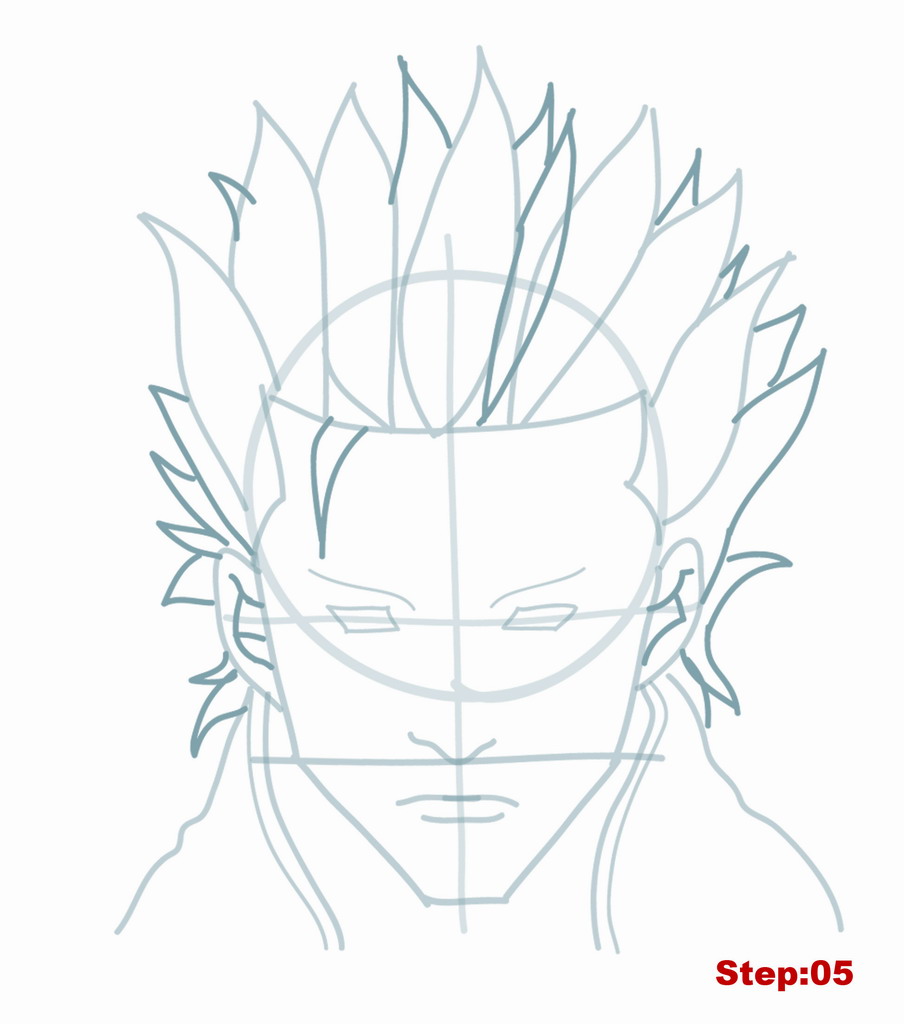
Step 05: We’ll continue with the hair in this step by adding some more hair spikes to thicken it up some. But, we can start with the inner ears by drawing in the irregular shapes. Then, starting on the hair line on the forehead let’s draw the hair spike falling forward over the forehead on the left. Then, between each of the major hair spikes at the top, I’ve added a little “^” spike. I also added one larger hair spike just to the right of the center line. Just above and around the ear on the left, we’ve got to add four short hair spikes. Below the ear on the left, there are two more small spikes. On the right, starting on the last major hair spike we drew in the previous step, we’ll add one more large hair spike that stops on the ear about half way down. There is a last small hair spike under the bottom of the ear on the right. And, between the two spikes we just drew, the longer one above, and the small one below the ear, we should draw a crescent moon shaped final spike. Once you’ve got all of that to your satisfaction, we’ll move on.
Step 6
Step 06: Now, we’ll zoom in on the face in order to draw the outline of the shadows and the areas to be shaded on the face. We’ll start with the curving lines just beneath the eyebrows that touch the corners of the brows. Then, let’s draw the half circle inside each eye. And inside that, we’ll draw an even smaller tiny half circle for the pupils. We should add a line starting on the hair line on the right and coming down to almost touch the top of the eyebrow on the right. Based on the nose we need to draw the two irregularly shaped lines that mark off the filled in space from the shaded area. This is for the shadow his nose casts as the light is coming from the left, a nice example of our 3D shading principle. The first line is more centered and longer, while the second line ends in a large triangular shape under the eye on the right, this will be for where his cheek bone catches the light. . (Check the image above if you’re having trouble.) Next, we should draw curving lines above and below the mouth lines for the bottom parts of both lips that are shaded. We’ll connect the upper lip to the outer nose line with a small line. And we’ll connect the bottom lip to the chin with an irregular “s” line. The shape of the shadow should nicely define the contour of the chin. Once you’ve got that we’ll continue.

Step 7
Step 07: Some more fine detail here. We’re continuing to mark those areas that will be completely filled in in a later step. It would be best just to follow the example I’ve given above and try your best. An important place is to try to get the “U” shape between the eye and the triangular shape and to get the wrinkle areas under the eye on the left. And in the middle of the forehead, the wrinkle marks are important as well.

Step 8
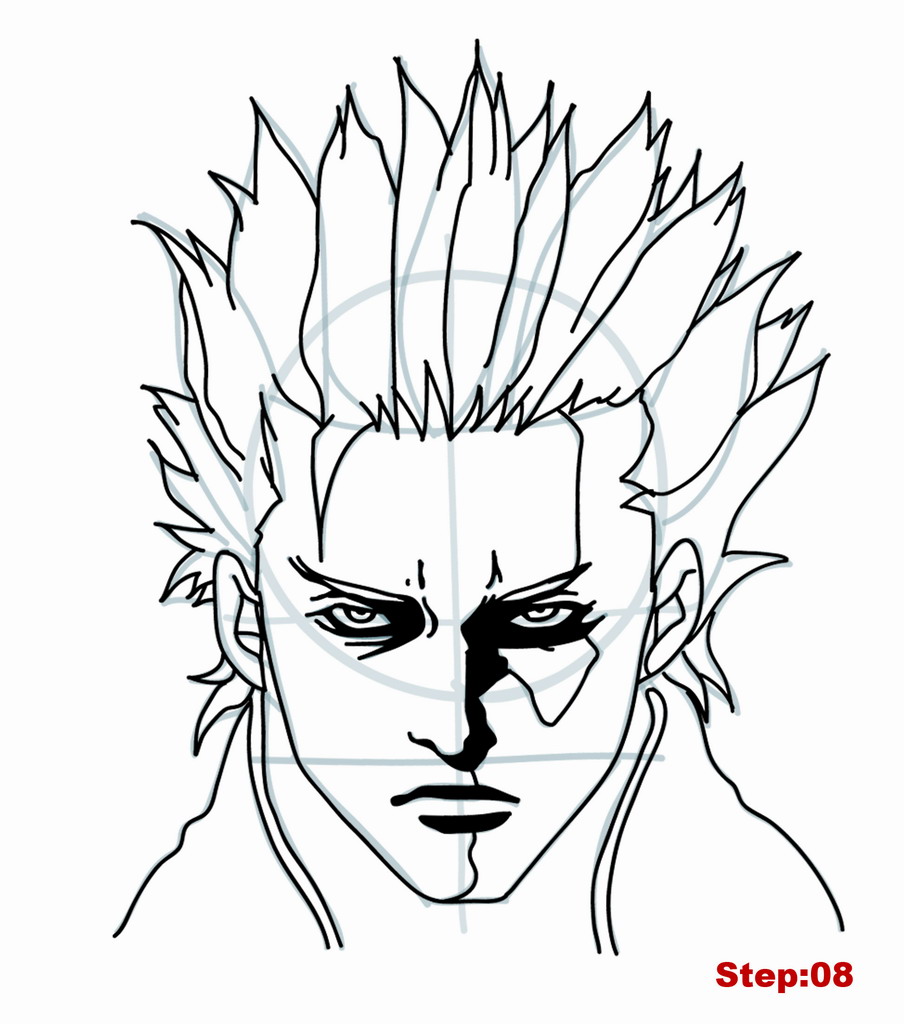
Step 08: That does it for our construction lines. Let’s get out our pen to trace the final lines. We’re going to be drawing our final lines in two steps here. We’ll add more detail to the hair in the next step as it would have been too messy to draw construction lines for the little detail lines we’re going to add to his hair next. As you trace, you probably want to start with the major shapes and leave the face for last. As you go around, one spot to pay attention to is the hair on the forehead. If you trace the spaces between the hair spikes close to the head you should get the small little spikes just above the forehead. As you move in to the face, we don’t need to trace all of the features, we can just fill in. So, we’ll fill in the areas around the eyes, the right of the nose and the lips. We can also take a moment to thicken the wrinkles just above the nose. Also, be sure to trace the line marking the shaded area on the right side of Vergil’s face.
Step 9
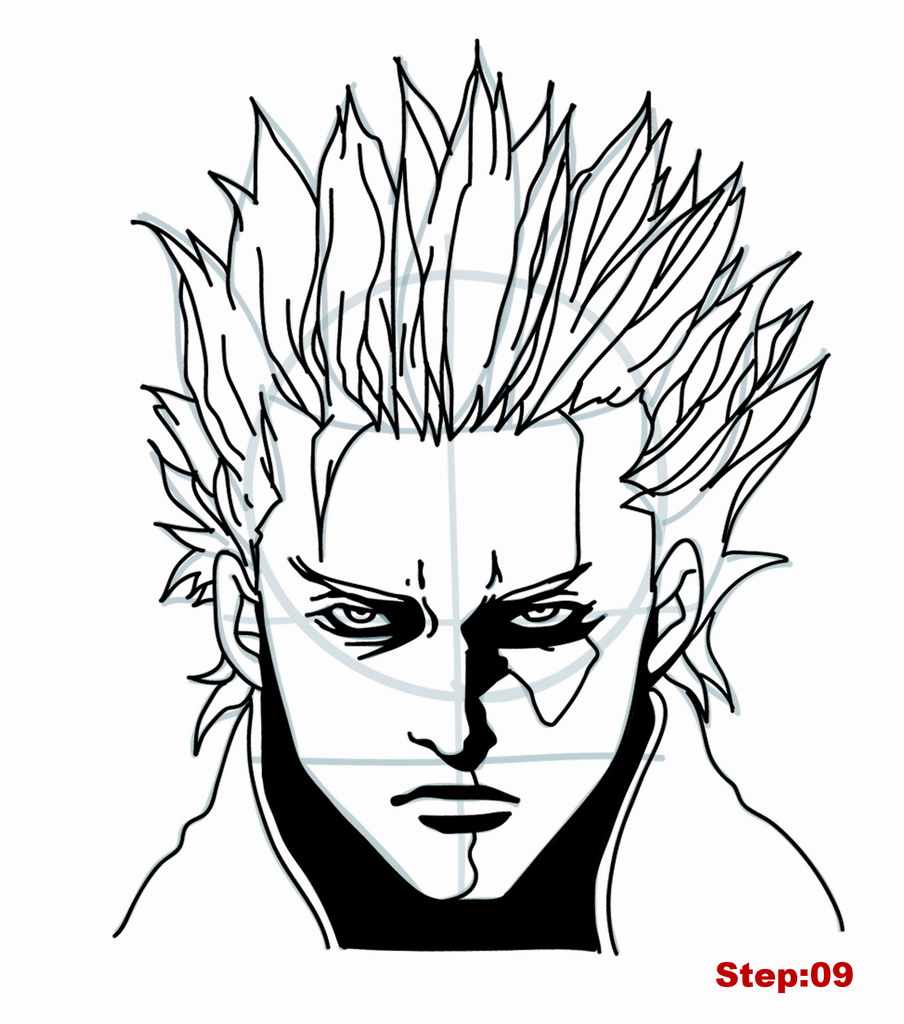
Step 09: Two things to do in this step. We’ll add a lot more wavy lines to the hair spikes to suggest strands and layers of hair. Then, when you’ve got Vergil’s hair to your liking, just use your pen and fill in the area between the jaw and the collar of his cloak.
Step 10
Step 10: Now, after your ink dries, just completely erase any construction lines you can still see. You could stop here and have a fairly good looking Vergil, but we’re going to continue for just one more step to do some shading.

Step 11
Step 11: It might help to have a ruler handy in this step as the shading lines are small and pretty straight. Alternatively, of course, you could shade in the grey areas with a grey marker instead of the lines if you prefer. So, following the pattern on his face, we’ll draw straight diagonal lines for the shading. I’ve also shaded some of the hair spikes too. You can try the same. For the cloak, I started by drawing shading lines across the whole right side and then I just filled in those areas I wanted to be black, leaving a few irregular shaded areas to suggest wrinkles in the cloak. Lastly, I’ve filled in a few of the tips of the hair spikes at the top of the head on the right.
Once you’re finished shading and filling, take a breath and have a look at Vergil from Devil May Cry. If your goal is to become a great mangaka make sure to draw Vergil again from memory. Then compare the final drawing with the original and correct any mistakes you might have made. Try once again from memory. This is the best way to build a huge library of shapes that you can use in the future for your own manga characters.
Draw with passion! -_^
Hiroshi




14 comments
damn! u make it look so easy to draw him!! ok, i’m gonna pull out the pencils and have a go…
sorry, just looking at all the messages above, is making me feel like i talk too much!! lol!
Dante looks … diferent… not sure if I like it, but the demons are still cool http://youtu.be/yKfxq8m4wgg And yes, I will probably buy the HD collection to play DMC3, it seems Xbox version is cheaper for some reason ^_^. It’s good that I have all the consoles
Its a secret!
 I draw most of my tutorials on Ipad and then edit it in Photoshop. This is a good pipeline for tutorials as it is fast and already digital. But if I wanted to draw something for myself I would probably prefer o,5 mechanical pencil, paper, kneadable eraser and Mono Zero eraser for details. Its the best sharp eraser there is, how comes they sell it only in Japan? 🙂 And If I went for digital I would definitelly use tablet and Open Canvas. Do you know this soft? It’s great, it can record the drawing process and there are lot of saved events online you can download and watch how the pictures were drawn.
It seems I own the version of PS3 that doesn’t support the PS2 games.. I tried the PS2 but my analog sticks doesnt work? Got to try again, maybe I need a new controler..
http://www.howtodrawmanga3d.com/vergiljpg
Comments are closed.